Seat
Gearbox stripdown
by Darren on Feb.24, 2013, under Seat
Aside from wanting to change the Quaife ATB diff for a plate one, there had always been a problem with the Ibiza’s gearbox, and that was that it was very noisy – it sounded like a bag of ball bearings, in fact. The synchro on second gear was always a bit lazy (not helped by my poorly co-ordinated gearchanges on gravel!), so that would probably need replacing too. Now it was actually out, it was time to strip it down – something that I’d done some reading up about, and was a little concerned that there would be some potential problems on the way. Anyway, here it was, ready to come out.

Dirty box!
Stripping the first casing off was straightforward, but behind it was the pair of gears for 5th gear, and this was the potential problem – I’d read a number of horror stories about people chipping the gears, and I really didn’t want to do that; this meant being really careful and modifying my puller to get into the 1.5mm gap behind the gears. Out with the grinder, spent about 10 minutes getting it into shape and while trial-fitting one of the legs, I pushed it in…. and the gear moved! This was really good news as one of the gears came off without any issue at all. The news got even better when the other one came off just as easily. Splendid. Now it was just a case of undoing another 6 bolts for the inner gear pivots and then all the case bolts, and then…

The business end.
… all the insides were revealed. All looking good, and easy enough to strip down further – it looks a very sturdy box, and is far easier to take apart than the Skoda box was. There’s more work to set it up (both shafts and the diff need to be set precisely), but it will be much easier to put back together once that’s done, thankfully. Here are all the bits that had been removed:
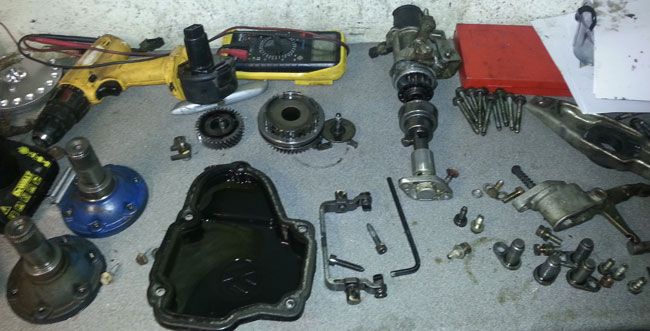
Where do all these bits go?
Driveshaft flanges, casing, 5th gear pair, selector, pivots and clutch actuator. All easy enough. They were bagged up, and then it was time to remove the gears and the diff, leaving me with a box full of bits:
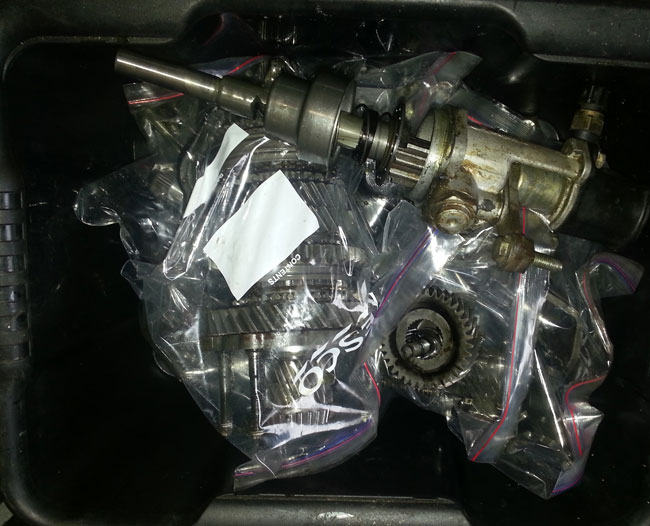
Box of bits. A gear box.
And also the Quaife ATB diff, which I will sell to help fund the purchase of the gripper plate-type diff.
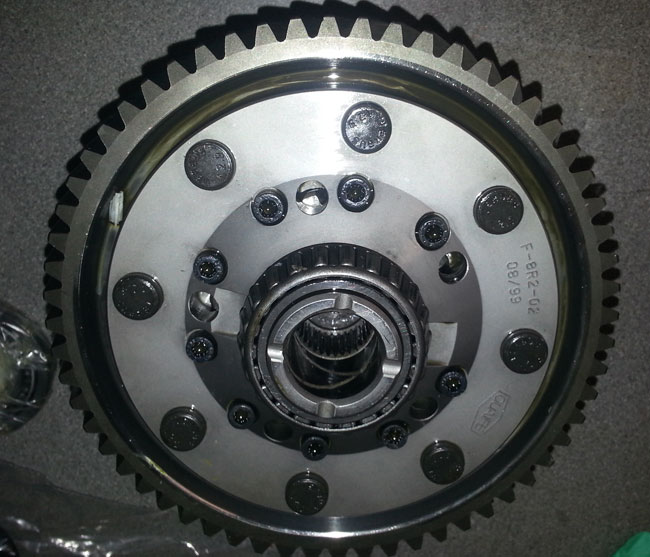
“The postman’s diff”.
Now I had a couple of empty casings, which needed to be cleaned up properly.
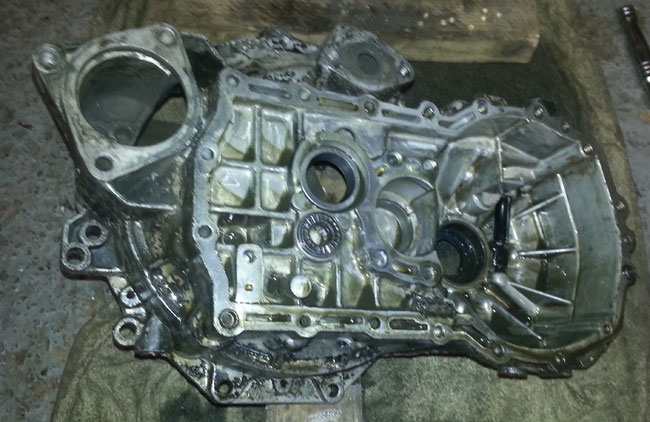
Empty casing of the gearbox.
This is not just for cosmetic reasons although the gearbox was painted at some point, badly and with some terrible paint, so it looked awful. When I did this with the Skoda gearbox, it also had the benefit of making it far more corrosion proof – it didn’t look bad after 3 years of use, so I’ll do the same with the bead blaster. All I needed to do was remove the bearing races, as I have a new kit of bearings to replace the old ones – some of them are unusual, so the 7 bearing kit cost a rather pricey £100:
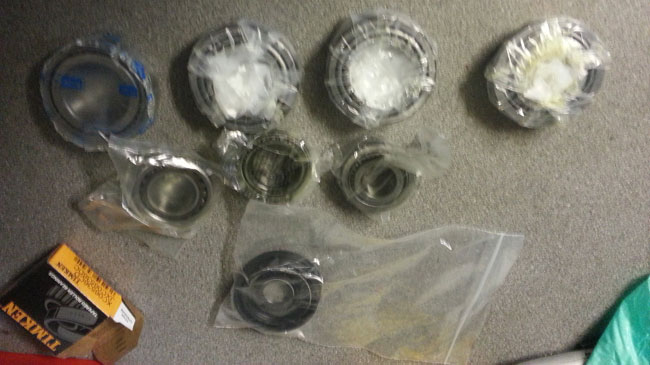
Shiny new bearings.
On removing the bearings, the reason for the noise became apparent – the diff bearings were about as knackered as any I’ve ever seen. I think the diff bearings may not have been set up properly, having too much load on them, leading to this:
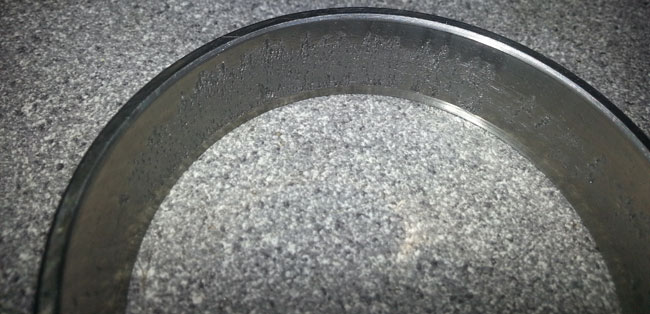
Rough as hell.
That bearing race should be perfectly smooth, and even in the rather poor photo above, you can see it’s anything but – both bearings were badly damaged, and this alone would have made it sound horrendous. This damage was confirmed by looking at the magnet in the gearbox that is there to retain the (inevitable) bits of swarf that are in a gearbox during its lifetime as the parts wear:

There’s a magnet in there…
It was completely covered in the stuff, mostly bits of the bearings that had broken up. Next up was the lengthy task of cleaning up the cases, both inside and out. Lots of cleaning, then bead blasting meant that this:
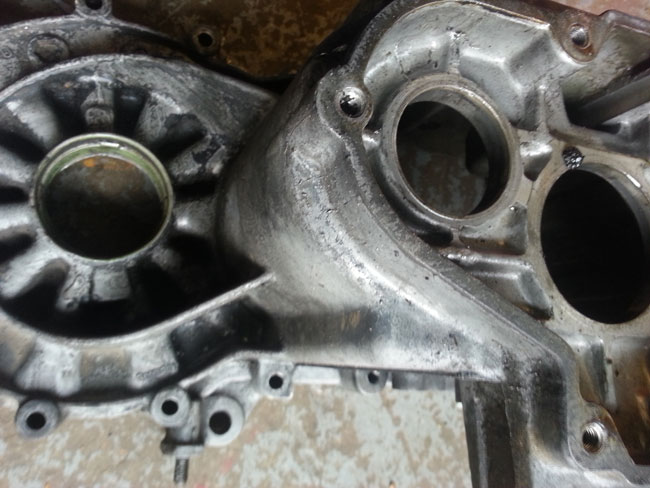
Dodgy old casing
Ended up looking like this:
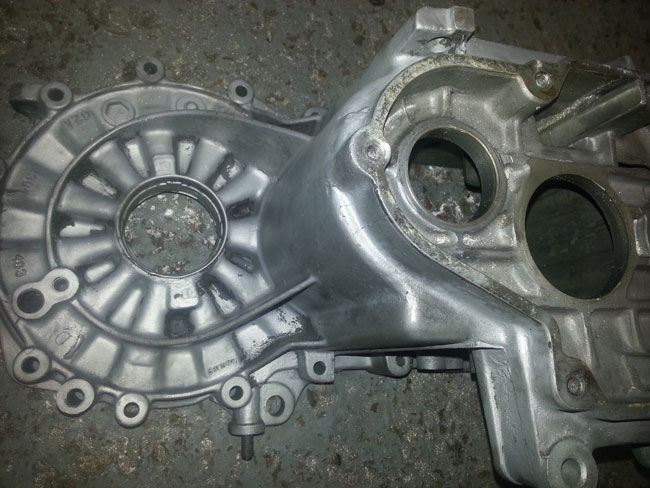
Nice and clean
It’s not perfect as my blasting cabinet is too small to be able to get to everything, but it’s way better than it was before, and also means it could be examined properly for damage, and thankfully none was found.
In other areas, the new (much larger) radiator was fitted today. The fitting really just meant moving the mounting bar down by 60mm, which thankfully didn’t mean any other changes. The radiator slightly obscures the oil cooler, but I will make up a duct to stop the air from the radiator passing by the cooler, and open up some space in the front panel to improve airflow to it. Here it is, fitted:
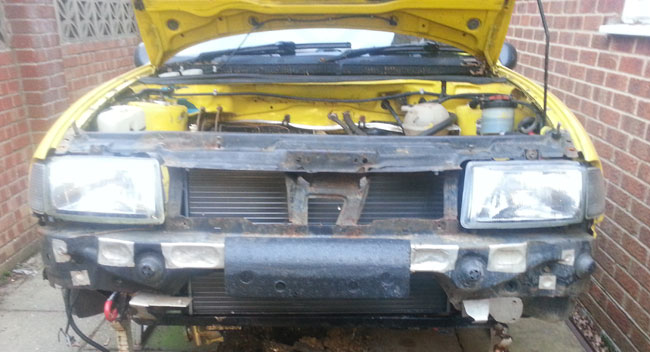
Much bigger radiator!
As you can see, it’s MUCH bigger than the original (about 1.4 times the area), so it should do the trick. A long day’s work, but at least the car is moving in the right direction. I’ll be ordering the LSD this week (no, not the drugs, although the thought has crossed my mind!), and hopefully making some progress with the driveshafts.
Spot the difference
by Darren on Jan.27, 2013, under Seat
So, last time out, I’d just discovered that the Ibiza’s current radiator was much smaller than it should be. A bit of time spent looking on various online catalogues only increased the mystery, however, as the standard size of the radiator wasn’t immediately obvious – there were a few different sizes listed by manufacturers, some different by car spec, others just different anyway – for the same year and spec of car, the sizes were different! Looking on VAG-CAT (a site with original microfiche info on it) opened the can of worms further as it listed even more sizes, one of which was very much larger than the current one. The front end of N194 DKE has been modified with a support bar for the radiator, so I’m not sure how it would have originally sat, but I found one of the largest size radiators on eBay for only £40, so I thought I’d order it and see what gives – it’s not the end of the world if I can’t make it fit – and this thinking was reinforced by the quotes I had for bespoke radiators which were around the £500 mark. As a wise rally bod said to me – “That’s OK, but you need two as if one breaks you’re stuck”, and with that in mind, I think modifying the car to suit a standard rad is a better idea, especially if they are £40 a throw. I had worried that a wider radiator will obscure the oil cooler, but even the new, massive one doesn’t do this – the end tank is slightly in front of the edge of the oil cooler, nothing more. The bar that supports the radiator will need to be made again, but that’s OK as a) it’s a simple piece of steel tube with flat brackets on and b) it’s bent anyway.
Anyway, that’s about as much as I’m capable of this weekend, I’ve had flu (yes, proper flu!) all week, and feel as weak as a kitten, so here’s a picture of little and large to be going on with. Next weekend, with any luck, I’ll get the engine out and get to the gearbox at long last!
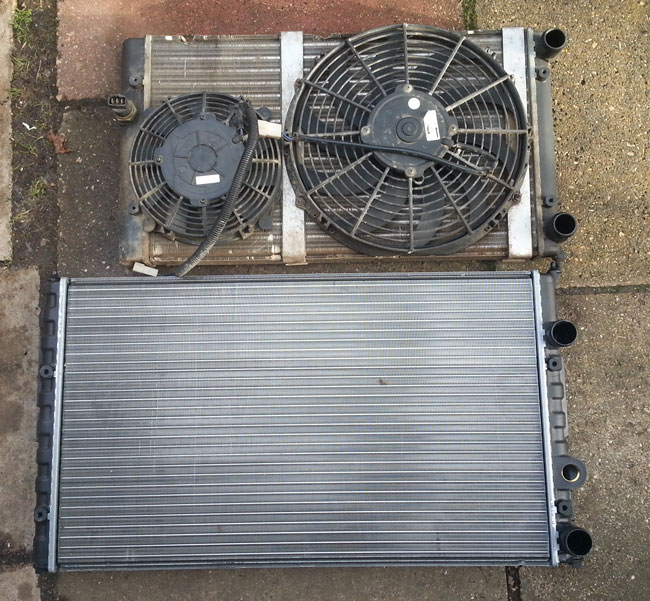
Big rad, little rad!
Well, that’s one mystery solved…
by Darren on Jan.14, 2013, under Seat
… as said the other day, the Ibiza has always overheated – well, not overheated, but run very hot and when used on gravel, definitely overheated – on the Sunseeker the temperature gauge was always far too high for my liking.
And I’ve just found out why! I said I thought the radiator looked a bit small. It is. From the part number, it’s intended for a 1.8 Golf MkIII. With a (maximum) 66kW engine, which equates to 90bhp, give or take. And given that the Ibiza is generating about twice that, I think this may be why it was running hot! Unfortunately, it looks as if the solution will be a bespoke radiator as the space available is somewhat limited by the presence of the (also necessary) oil cooler.
New Beginnings
by Darren on Jan.13, 2013, under Seat
So, it’s been a few months since the last entry on here, and that’s been for a number of reasons – firstly, getting over selling the Skoda – not only because I sold a car that I spent a lot of time and money building, but also because it represented the end of a chapter for me, the possibility of doing Rally GB (or indeed any other sizeable International event), which took a while to take in and see what I did in the past for what it actually was – a great achievement and something that very few people are lucky enough to get the chance to do once, let alone four times.
Secondly, I decided to make up for selling the car buy realising a boyhood dream, and buying a Porsche 928 with the money. Yesterday I sold that car, and while I’m glad I bought it and don’t ever have to go back there again, it didn’t work out in the way I’d have liked; so many things suffer from ‘reality shortfall’ and the 928 was definitely one of those. The car wasn’t a dog by any stretch of the imagination, but it wasn’t the dream car I’d hoped it would be.
Thirdly, I’ve just been really busy with everyday life, working and spending time with Tammie and the kids, so I have less time to spend in the garage.
Fourth, Rallye Sunseeker has been moved to October 2013 (instead of the usual February), so there hasn’t been any real pressure to get the car done; at the time of finding out about the move it was just about a year away, which made it seem incredibly distant. Combined with wet weather this meant nothing really has been done.
Now, however, it’s time to get on with it, so I’ve made some progress today on getting the car ready. The first thing is that the gearbox needs to be rebuilt – it sounded like a bag of spanners when I got the car, and that didn’t get any better over the three events I drove it on. According to the manual, this should be a fairly easy thing to do, but there were some issues; firstly I couldn’t get the sumpguard off! Two of the four bolts that hold it in place were solid; no idea why as they were all greased when fitted and all bought at the same time and fitted to the same torque, but there you go. And as they are recessed allen bolts, removing them was not straightforward. Fortunately welding bolts to the heads got them free in the end, but it was a lot more work than it needed to be!
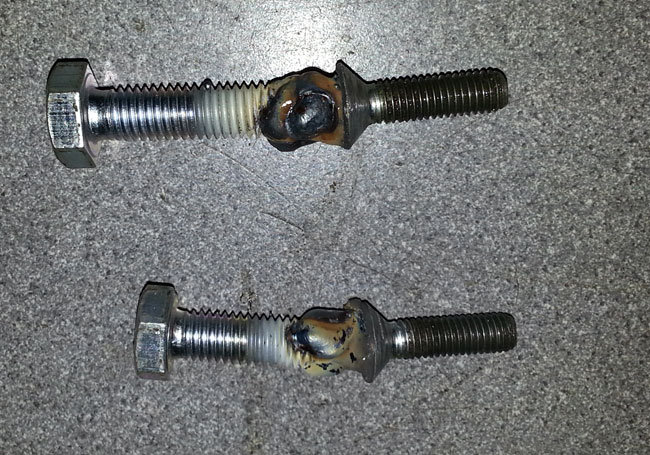
Bolts!
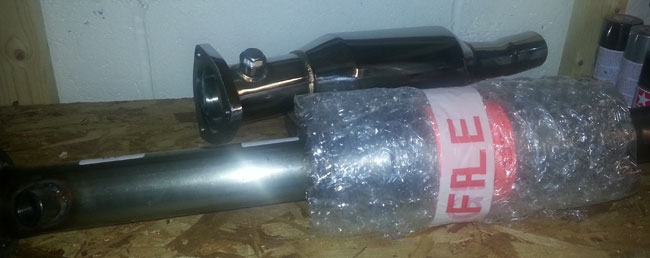
Now, according to the manual, it should be possible to remove the gearbox leaving the engine in situ, but after an hour or so of trying, it became apparent that this is not the case – it just wasn’t possible to do it as the subframe was in the way no matter how I tried, so the whole lot needs to come out; this will give me a bit of a leg up with another issue as the exhaust manifold isn’t something I’m happy with, so I’ve decided to change it to something better, and also replace the catalytic converter as it was on its last legs at the last MOT and I’d really like a car that I can MOT anywhere, anywhen as the MSA are clearly becoming far more on the case with things such as emissions. To that end I have bought this little beauty:

Shiny!
It will need modification to fit (probably a fair bit), but it’s a good starting point, and it was a bargain at just £72 brand new. I’ve also bought a new cat and bypass pipe (to allow mapping without killing the cat):
Cats!
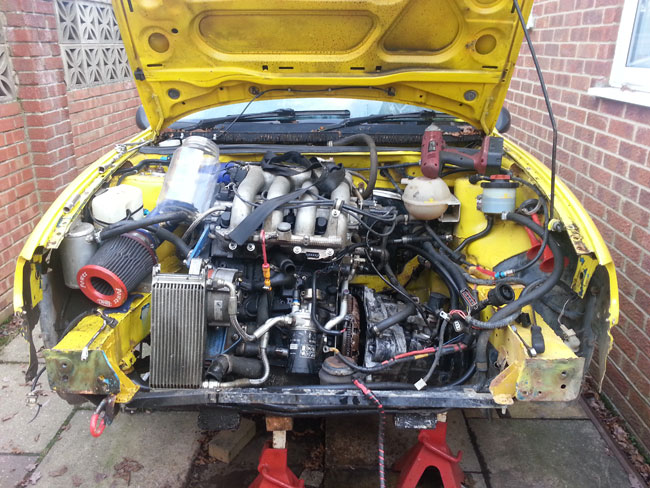
So hopefully all of that will make life much easier. In addition, this was all spawned by the incredibly difficult fitting that was done before, so I’m hoping that the modifications will allow it to be fitted to the car with the engine in situ as it was difficult and painful fitting the old downpipe when the engine was in place.
This aside, it was time to get everything ready to get the engine out. Fortunately the Ibiza’s front end has a bolt-on front panel, so access to everything is much easier once that’s out the way.
The coolant radiator needs beefing up as the car was nearly always running hot when used on the Sunseeker, so I’m going to give the whole cooling system the once-over, but the radiator seems tiny to me – it’s about the same size as the Skoda one, and that’s for a car that has one third the power as standard. Clearly something’s not right.
A couple of hours’ work left the engine bay stripped and pretty much ready to go, but there’s other stuff in the way in the garage at the moment so I’ve decided that waiting is the best thing to do – hopefully I can get the engine out next weekend, and then start working on the gearbox in the evenings.
In other areas, the driveshafts I ordered in June (no, really!) are still ‘in progress’ so I will chase them up – I did so over Christmas, so hopefully this time I’ll actually get them soon. I’m going to get rid of the ATB diff and fit a gripper to the car as I think this will help out, plus also find the cause of the uneven camber that has plagued the handling – with the engine out it should be much easier to make accurate measurements and find out what’s adrift (and get it fixed). There’s also a new cylinder head to go onto the engine, which should see it making more like the 200bhp I’m after, so there’s plenty in store, aside from fixing all the nasty little bodges that I’ve found today on engine brackets and so on!
Abingdon Car-nival
by Darren on Jun.11, 2012, under Seat
This weekend was an unusual one. Firstly, because I was doing a tarmac event – as a driver, other than Christmas with my sister, the first one since 2005, I think – certainly since 2006 when Rally GB took over my rallying for each year (or more to the point, my entire disposable income for the year!). And secondly because my navigator was to be my girlfriend, Tammie.
Tammie has no interest in cars whatsoever – they are a form of transport for her and nothing more. She knows nothing about motorsport, but wanted to see what it’d be like to take part in my hobby, and I thought that would be a great idea – not because I expected to “convert” her, or even that she’d particularly enjoy it, but so she’d have an idea about something that I love doing that she currently has no experience of. This is not to say that she hasn’t been supportive – she has been – but she wanted to know more about what it’s like to do a rally, and this seemed the best way to do that.
Our original plan was for the kids to come with us, and for friends to look after them and to babysit them while we were out, but the weather forecast was for rain on the Sunday which would have meant a miserable time for them, so it ended up being just Tammie and me that went, armed with Mark’s van and my pop-up tent – scrutineering was on the Saturday with the rally itself on the Sunday. After a bit of a false start, we left about 2:30, and got to Abingdon for 4:30, unloaded the car, and went through the usual stuff of noise testing and scrutineering which all went fine. We found a place in the service area (next to the Furzeland WRCmobile) and left the car there, while we went to the quiet camping area to set up as I wanted a good night’s sleep.

Pump it up!
With everything set up, we wondered about, with Tammie asking a few questions about the cars that were there, and being surprised at how much some of the cars cost, particularly in the case of the high-spec Mk2 Escorts; I guess I’ve become used to the massive price tags, but they really are a shock to anyone who hasn’t, which might say a lot about the sport. There was some entertainment put on which was OK, and we trundled off to bed at about 10…. only to find that there are some less considerate people about than you’d expect. In the “quiet camping” area, there was a massive motorhome with a Porsche sprint car behind it. And behind that – their generator, which was noisy. Carefully placed as far away from them as possible, but nearer to everyone else. Why people don’t think about it (or park in the normal camping area) I have no idea, but unfortunately the rules said “generators off at 11”, and they turned it off at about 10:50, with cheers from all around the camping area, so clearly we weren’t the only ones annoyed by it.
Sunday dawned bright, and after putting the tent and all the gear away, it was time to get into rally mode, so we went and got ‘set up’. I say set up, I mean got a tarpaulin out of the car with a few tyres to hold it down, that is the extent of the setup. I checked the tyre pressures and swapped the front tyres over as I’d put them on the wrong way round on Friday, and we were ready to go.

Ready to go.
We had an hour spare, so we went to watch the cars come through the complex by the service area, and it was manic; we saw all sorts of shenanigans including one car spinning on a hairpin giving it too much power, with a car right behind them that they almost hit, and a few cars shortcut the hairpin completely after the cones had been thrown all over the place. It was soon time to get going, so we went and got strapped in, and headed off for the first stage, and typically there was a delay, so Tammie had to go and get out to check with the arrival control marshals who said all was well. She got strapped in and we got the usual arrival procedure down, and were ready to start the stage. Off we went, the car felt nice and quick, a massive change to my usual “wait for the Skoda to get going”, and the first few corners went OK. I wasn’t 100% on my braking in the car as I’ve never had the brakes really up to temperature on tarmac, so I was fairly cautious, but they worked fine, and we headed into the concrete ‘tunnel’ before the complex and then out the other side. Unfortunately Tammie had got a bit lost, but I was OK as I’d remembered what was there from looking at the maps, and the next few corners were fine. Next up, the tight/narrow section, where later on one of the other cars was off so we’d be missing it out, but we headed into the first bomb dump, and Tammie was back in position, calling the next two corners which were a right and another right… which once we were out of, I put my foot down and the car went forward and then revved up.
No drive. Something had broken, which was a nightmare – we’d done about a mile and a half, if that. More pressingly, we were blocking a narrow section of the stage, so Tammie got out to warn the following crew while I tried to move the car, but the marshals were on the ball, and had closed the section as well as coming over to help move the car, which wasn’t an option as we then hit it into a little hill.
Dammit, we were out. Once the stage had completed we were moved to another area by the ever-friendly marshals, and then out into another area where the recovery crews were later on, and we watched SS2, while I tried to cheer up. Another expensive DNF, this time not getting going at all, really. The antics of some of the other drivers took the edge off – it was interesting seeing the different approaches people were taking to their driving and the corners as well as some impatient people knocking others out the way, etc.
The recovery crew were quick and efficient once they had an opening to get us off the stage, and soon enough we were towed back to service, so it was a case of get packed up, get the trailer and then (somehow) get the car onto the trailer (my winch is rubbish). I needn’t have worried – as soon as the car was lined up ready to go onto the trailer (with the help of Jason Riggs from BDCC) a group of people appeared and pushed the car onto the trailer without any effort while Tammie steered it. Most had already walked off before I had a chance to thank them, so if that was you, then thanks! Rally people, as helpful as ever, putting a bit of a shine on an otherwise bad day. A two hour drive home was uneventful if a bit galling as it was about 1:58 longer than we’d spent in the car, but I guess that’s rallying – if you can’t take not finishing then you probably don’t deserve to finish. I just think it’s becoming a bit of a habit; I’ve not actually completed an event in the Ibiza. Time for a rethink.
Slacking off…
by Darren on Apr.16, 2012, under Seat
… is NOT what I’ve been doing. Although I’ve had the last couple of weeks off, I’ve been really busy, but mostly not with rally car-based stuff. However, I have not been completely lacking in progress. First thing, the Felicia passed the MOT last week, which was really my target to get done by the end of my time off, so that was good. For the most part, driving it was OK (aside from the freak hailstorm that happened on the way home, which was interesting on the tyres I was on – would have preferred either forest tyres or a Kayak!), but the mapping still needed work – there were a few flat spots here and there when driving in traffic or pulling away, and it was a bit erratic tickover-wise – sometimes it would be OK, other times it would just stall. Fortunately it played ball on the day, which was nice.
So, that left me with a bit of breathing space, and the rest of the time was taken up sorting out other issues (such as selling my Mum’s car for her, having MOT-ed it, so alas we only have one Felicia now), but today I’ve been able to get on with sorting out the mapping. Previously I’ve done this by using a datalogging device, and then analysing the data and then working from there. But the problem with that is that it needs a LOT of data, and there are some parts of the map which don’t get used a lot, so the analysis software doesn’t have enough data to work with. These areas are combinations of engine speed and load (i.e. throttle position), and in the case of these rare ones, they were clearly areas which get used when pulling away in traffic or from junctions, etc. – they were passed through briefly hence the old system not helping. So I decided to find them and then do the adjustments manually, which took a bit of juggling as I needed to left foot brake to keep the engine revs at a desired speed, and then adjust the throttle to find the flat spot. All of them were from too little fuel – in some places the mix was nearly half what it should have been – and once found were easy enough to sort out. As the day progressed, the map started looking better – it started out looking like the alps, and while it’s not super-smooth now, it’s much better, and the car is much better to drive. It’s still not got much guts under 3000rpm, but that’s because of the cam, I think – the fuelling is OK, so it’s either a lack of ignition advance (the other key parameter the ECU controls), or it’s just plain gutless. But the car won’t be being used like that, it’ll be given beans and always be “on the cam”, as they say.
Ignition timing is the other area that needs adjusting, and it’s trickier than the fuelling; with the fuelling I have got a device which measures the mixture and gives a readout of it, making mapping easy (or even possible!). But for the ignition timing it’s much trickier, as if the spark happens too early (too much advance) then the engine can get damaged very quickly, with pistons needing to be replaced at best. As a result, this isn’t something I’m going to mess with too much, but having looked at the map, I noticed that on full throttle around 4000-4800rpm the advance was much less than the surrounding areas, and that was the place where on full throttle there was a flat spot – the mixture is spot on, but there’s not enough power being made. So I took the brave/foolish decision to increase it to a more suitable (but still conservative) value, and gave it a go. Much better! It’s still a little flat there, but I’d rather err on the side of caution, and look into a way of measuring “knock” (i.e. too advanced a spark) before it’s too late, and leave it for another day to tune.
There has been another improvement; I’ve done some reading up, and taken people’s advice (particularly Dave Walker), and added in more advance below the desired idle speed. This has the effect of kicking the engine back up to speed if it goes to stall when ticking over, and I also discovered that idle mixture is important; previously I’d been told it didn’t make any difference, but doing this and getting the mixture right led to a car that finally ticks over on its own! This is great as not only does it tick over when left, but it also means that there’s no need for fancy footwork or use of the handbrake at junctions to leave a toe free to keep the engine going. The end result of this is that the car is much more pleasant to drive, particularly in traffic.
Here is the mapping setup (handily the Toughbook came with the Ibiza), and if you look carefully you can see the engine is still running, ticking over nicely. Splendid.

Tickover at last.
It’s still not finished, but it’s much better than it was, and fires up easily. The Ibiza uses the same ECU as the Skoda, and looking at its map shows the difference between the cars – the Ibiza map is smooth, looking like a nice hill from Teletubby land, whereas the Skoda one still has that “Craggy Island” look to it. But it’s never gone better, so it’s going in the right direction.
Good news!
by Darren on Mar.11, 2012, under Seat
Last time out, the damage list was driveshaft (already replaced with a standard one), power steering pump (and possibly the rack) and the missing fuel cap of woe.
This week I’ve been at work and had a fair bit on this weekend as well, but I’ve managed to make some progress. The first bit of which was nice and easy to fit. Before:

Lovely on-event bodge.
My lovely bodge with gaffa tape. However, thanks to a very helpful Matt from Think Automotive I now have a nice new cap:

Shiny, and no ATL badging!
The big upside of this is that it cost far less than I thought – £65 in total. Not cheap for a fuel cap, but a lot less than I originally thought! Next up, the power steering. I ordered a new pump, which needed a bit of modification as the inlet was at a different angle. It took a bit of doing to get the inlet out of the new pump, but the old one was easy enough. With a bit of work, it looked like this:

Won't look like this for long...
I filled it up with the right fluid, and thankfully it seems that the rack hasn’t been damaged – it seems fine from lock to lock, and now the car is back as it was. However, I want to avoid another broken shaft so I’m now looking into getting some stronger shafts made, so hopefully by next weekend I should have some definite news on this. Work will be starting on the Skoda soon though, as it is next up, in September, with any luck.
So, what’s the damage?
by Darren on Mar.04, 2012, under Seat
Since last week, I’ve had a bit of time to spend on the car, cleaning it up and assessing what’s needed. Here’s what I found:
Firstly, cleanup – this didn’t take as long as last year – the roads were much dryer than before, so it ‘only’ took about 2 hours to jetwash the car off – there’s still a great deal of mud stuck to the car, even when it doesn’t look too dirty. Obviously I don’t want to leave all that there as the car won’t be seeing much use in the foreseeable future, so it needs to be as clean as possible. Last year it took me ages to clean all the mud off the road, so I decided to do it on a tarpaulin this year to make it easier:

Clean up!
And once it was all done, and de-stickered, looked much better:

That's better.
Next up, assessing the damage. The first thing was looking at the driveshaft, which had sheared off where it goes into the outer CV joint. Once I’d removed the boot, the CV just fell off, revealing this:

Shake it up baby...
A cleanly sheared off shaft, just twisted off at the end. Once I’d taken the outer CV apart, I got the end bit out, which was a little more revealing:

...Twist and shout.
As you can see, the splines are twisted, and the shaft has just said “enough” and broken off. I’ve done some asking around and had some helpful advice and info from people on britishrally.co.uk and the general consensus is to fit new shafts and life them, stripping and examining after each event. However, one guy has a Golf which uses the same shafts, and he had a similar failure on a brand new shaft with only 300 miles on it. I am still unsure what to do, but there’s no immediate rush; I will look into the possibility of getting some stronger shafts made up as I don’t want to suffer a DNF on the car’s next outing (which may well be Sunseeker 2013, alas!).
Other than that, it was time to see what happened to the power steering pump; while moving the car about, I realised the power steering had failed again, and saw there was no fluid left in the reservoir. I was surprised to see that the loose union wasn’t the cause of this second failure, it was another problem – the low pressure feed into the pump had a cut in it, so that’s something else to look at. The pump, however, is dead – it was whining like hell after refilling as I had expected, so I am hoping the damage is just down to that and not the rack as well. Time to order a new pump, which shouldn’t be too expensive. Or rather won’t, once I’ve found out what it is, as the pump isn’t one from an Ibiza 16v, according to the books I have seen, as the inlet is at a different angle…. a bit of experimentation is in order.
And aside from a few bits an pieces, that’s it really. At ‘normal’ prices, the damage from the Sunseeker is as follows:
Power steering pump: £80
Driveshaft: £70
Lost fuel cap £150.
So, with a stupid error, I’ve pretty much doubled the cost of getting the car back up and running. D’oh.
Done!
by Darren on Feb.16, 2012, under Seat
No rally car looks complete without stickers. And having removed all the blue ones from before, it was time to get some nice ones back on there. I don’t have much in the way of sponsorship, so it was time to do some self-promotion, as well as promote Xtreme Outdoor, who sell kayaks, skate and scooter gear and whose owner Mark has lent me his van on a number of occasions! In addition the car was looking quite drab and dull as the paint has faded a fair bit, so I spent most of the day polishing it and then applying the stickers which Andy has as ever provided in next to no time. Removing old sticker goo takes ages – even more so when it’s on a plastic window that you don’t want to scratch. But I think the end results are worth it:

From the front.
I’m hoping the TOW sticker isn’t too inconspicuous.

New domain name.... still the same blog!
Titon harnesses – both an advert and a gravel rash cover.

And from the side.
Eagle-eyed readers will note that the tyres are not the right ones – these are road-going winter tyres, which I’ve been shedding about while I get everything sorted out on the car. These have now been swapped for some more suitable gravel rubber which will do the trick. While I was playing about with the car I decided to clean the interior – it looks nice and clean in there now, as clean as it can be without a paintjob, and I’ve also reprogrammed the dash and cleared its memory; it’s an Aim MyChron 3 Plus, which is about £500-worth. At present it’s being used as a rev counter and speedo only, so it’s a bit under-employed. The speedo bit works fine when on the go, but when at a standstill it comes up with spurious figures, so I’ll need to check this out at some point. However, I have calibrated it correctly so it reads the right speed when on the go – previously it was miles out. I’ve turned off the gear display as while I like the geekiness of it, having a red digit flashing on and off on the dashboard is not conducive to a relaxed drive – I spent half an hour or so repogramming the dash to try to get it to work, but ultimately it clearly needs a better speedo signal than the one it’s getting at the moment, and if I need to look at the dash to know what gear I’m in when driving a car with an H-pattern box then I have more serious issues than that anyway!
So that really is it. The car is ready to rally as it stands right now. I’m going to have an entire weekend off from doing it or anything to do with it. Well, I say that, I bet something pops up that I think I need to fix.
This morning I was visited by a couple of students from Southampton Uni who wanted to interview me; they brought a camera over and interviewed me in the drive while in front of the car; when I get the footage I will post it here (providing I didn’t babble too much). I’m hoping to get a new tracking device fitted to the car in time for the event as a friend runs a company doing these systems, but I’ll have to get hold of him. And then spend the weekend working on the car!
Are we there yet?
by Darren on Feb.13, 2012, under Seat
Last time out I had a small list of things to complete, and I’d bought everything to do it. The original plan was to complete this on Saturday, but unfortunately real life got in the way of that, so I had to spend the weekend looking after Tammie who’d hurt her back for the first time ever. Fortunately she’s OK now and even more fortunately I have this week off, so I’ve spent today finishing off all the little things on my list in the garage.
The first thing was to sort out the breather arrangement – it had been bodged together previously and looked very dodgy, so a quick trip to Thread and Pipe up the road saw the correct fitting added to the inlet hose, and then the setup all finished off – now any breathed gas will be fed back into the inlet, as it should be. The engine doesn’t breathe at all heavily, however, so that’s all good.

Breathing properly is important.
Next up, an oil change, and for this I needed to drive the car for a bit, and for that I needed to put some fuel in, so a handy time to calibrate the fuel gauge. What wasn’t so handy was that putting 10 litres in made no difference to the fuel gauge reading. 20 litres registered an extra 1/8 on the gauge, so clearly it’s not up to scratch, and I’ll need to work on it in the future. For now, though, I’ll have to run a large reserve of fuel and try not to run out on the Sunseeker. Hmm. While out and about, I made use of a local half-mile marker to calibrate the Terratrip which now works flawlessly. I’ve said this before, and then had them die on the day, so we’ll see if the 404 is any better than previous ones!
On the upside, the car drives like a pussycat – granted the clutch is heavy and binary in operation, and it’s not a quiet shopping car, but it’s very pleasant in traffic and will be a nice relaxing drive in between stages. Once the oil was up to temperature, back to take the sumpguard off and do an oilchange which was routine, but a chance to do a spanner check on everything underneath, which was all as it should be. The thing that is really odd about the Seat is that most of it is really well built and seems professional – lockwired fasteners, well-made rigid pipes, etc., and now and again I come across something which just seems out of place; the sumpguard has a shield on one side which is a bit of mudflap material, and it was held to the sumpguard with nuts and bolts, which would be really hard to get to in practice – meaning you’d have to remove it from the chassis rail instead when you remove the sumpguard, which is a pain too. I replaced the nuts and bolts with rivnuts, and now it’ll be a piece of cake to take off, and still keep the mud and stones out of the engine bay.

See the rivnut, deep in the engine bay?
The rest was just bits and pieces – the towing eyes were not a “contrasting colour”, and it’s difficult to contrast with Council Yellow, but I’ve done it with Hammerite Red – helped at the front by painting the surround in matt black; the bumper on the car had been repainted from the original red and in this area it was a right mess; painting this not only highlights the towing eye, but also stops the front of the car looking like a piece of scrap:

Neat.
It looks better at 30 paces, honestly.
The harnesses are now fitted into the car, and you can see how neatly the bit of velcro keeps the intercom cable in place. As I said on Friday, I’m really pleased with these, I hope Prima have a lot of orders now that FIA harnesses are the norm for rally cars.

Nice new harnesses
And where I sit is ready to go – everything is back in place, and looks great; all the controls work as they should.

The office.
And that is just about it. Everything is crossed off of the “To Do” list – the car is ready to rally as it stands in the drive, right now. There are a couple of cosmetic things to attend to – it needs stickers which have been sent today, and it needs a polish as it’s rather dull-looking, but that can wait for Wednesday or Thursday. I actually feel a bit weird as the car is ready so early! Anyway, as it stands, here it is:

Ready for the forests.
Just need to change the tyres and job’s a good ‘un.

