Cage O’Clock
by Darren on Aug.10, 2007, under Build
So, I had the go-ahead from Custom Cages to start welding, so I thought I’d better crack on with it. Spent 2 full, long days this week doing the cage. At the beginning of the week, the main tubes were cut to size and profiled, but the mounting plates weren’t placed or anything like that. Really this was only 4 tubes, and they were gaffa taped in place. This wouldn’t pass scrutineering, BTW.
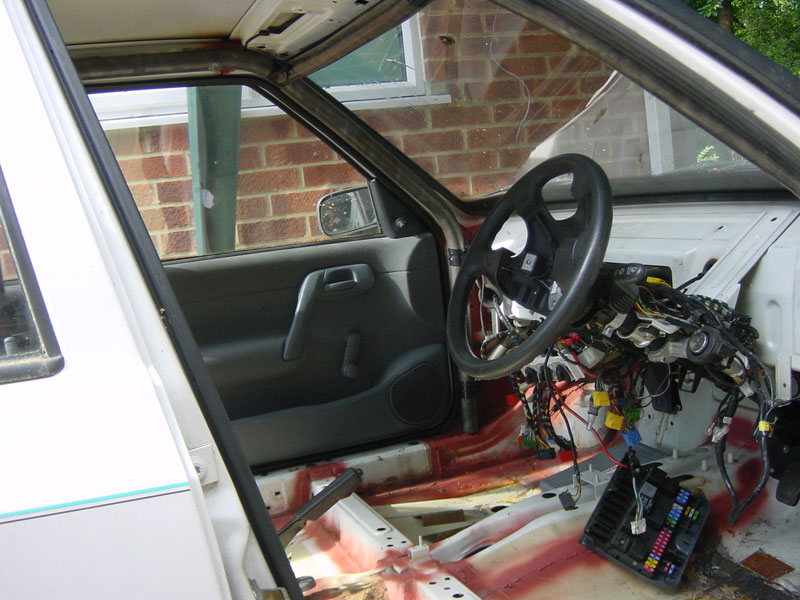
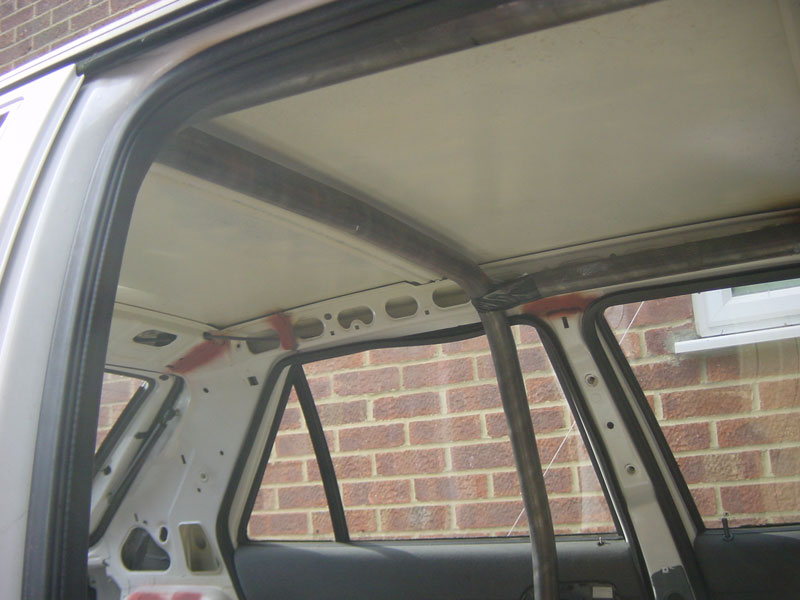
So, out came the tubes, cut them all down for the new plates which have to go under them, which was remarkably straightforward.
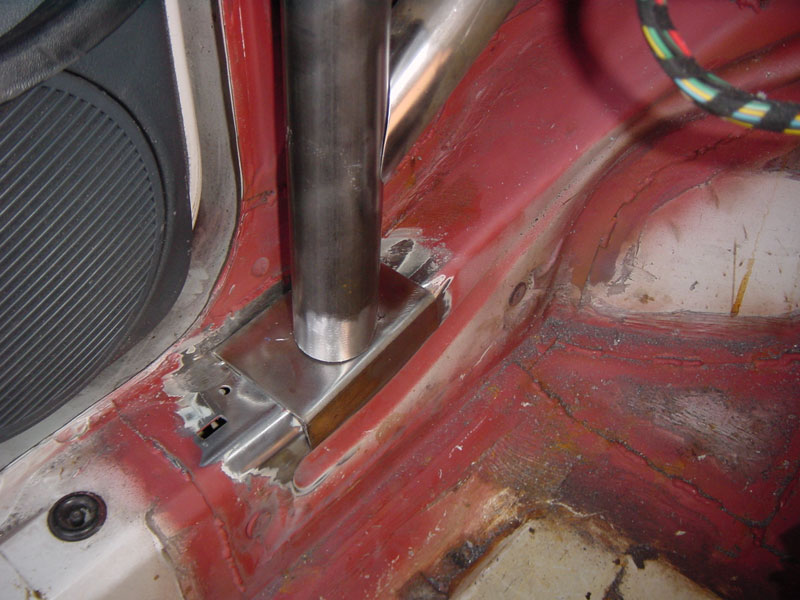
This was done on all 4, and then the cage re-assambled on them, and welded together where possible. By this time, I’d realised the screen needed to come out, which I managed to do without breaking it, for a change.
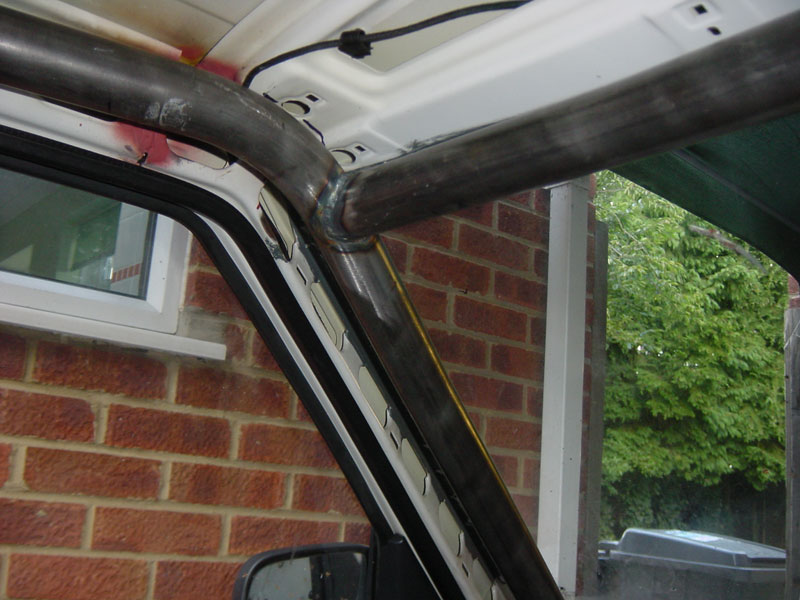
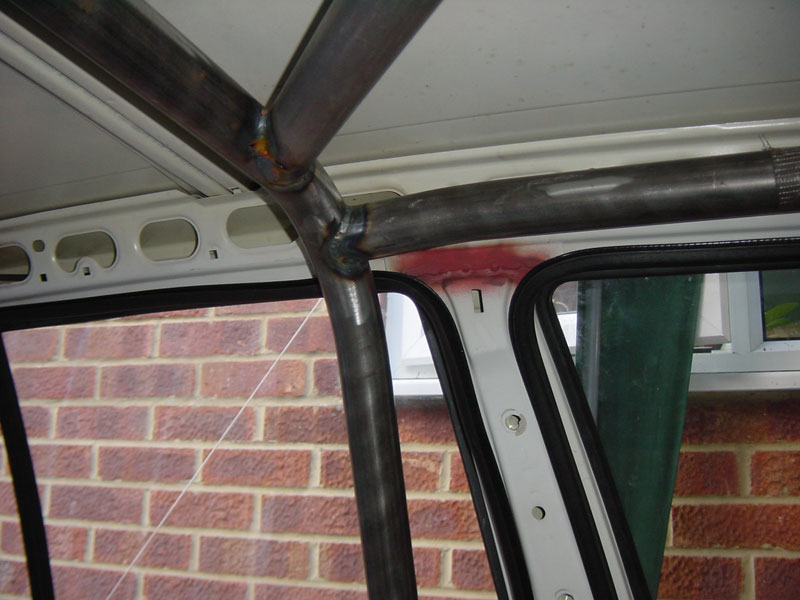
Then the cage assembly needed to be dropped down to allow it to be welded fully – one of the biggest problems with weld-in cages is that people don’t bother to weld the tubes all the way round, which is, frankly, mental. You don’t want to ever use a rollcage, but when you do need it, it needs to be 100%! To drop the cage down you have two options – either drill holes in the sills, or ratchet-strap the front and rear legs to reduce the width and drop the whole lot down by 3″ or so. This was duly done, and then the whole lot fully welded, and then the roof diagonal fitted.
That lot above took a full day to do. Seriously. It might look like an hour’s work, but I was making sure everything was 100%, and just tailoring the roof diagonal tube took about 90 minutes of grind, check, grind, check….
Next day it was time to put the cage on the mounting plates, so the plates had to be welded in place, which went very well – it’s amazing how nicely things can go if you prepare everything properly!
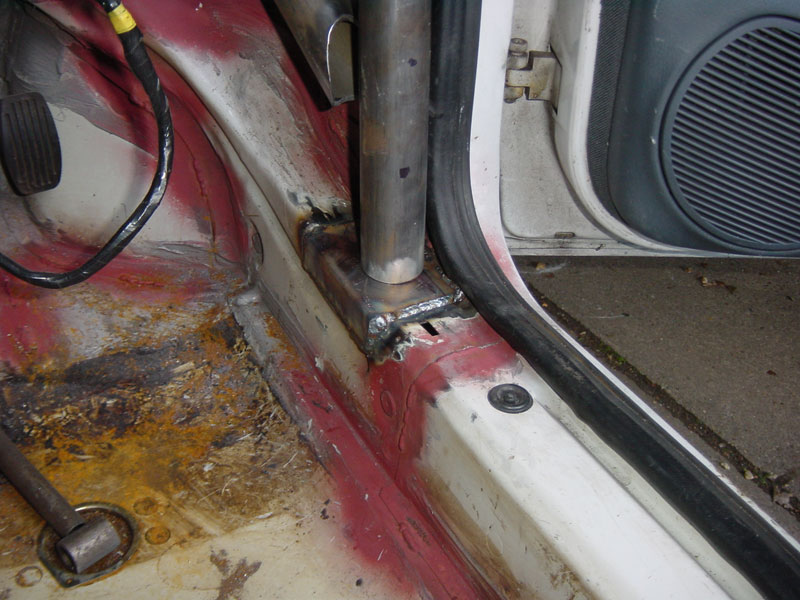
Once they were all welded in, the cage was raised up, and then the ratchet straps released….. which revealed a problem. I had been immensely careful trimming the tubes so everything would fit precisely. I was a little worried that one of the rear legs was about 5mm out of line. Custom cages say in their instructions that “it may be extremely difficult” to get the cage back on the feet. And they weren’t wrong! The legs had all moved due to heat distortion – not a huge amount, but being as strong as it was, I had to make up a tool to expand the legs – made from a piece of tube with a large thread in the middle that could expand the legs precisely. This took an hour or so to make, but there you go. I could then start welding the cage to the car, starting with the front right leg, then front left, and then lining up the rear legs and welding them. To give some idea of how far out it was, here’s the rear right leg before the tube was positioned and welded.
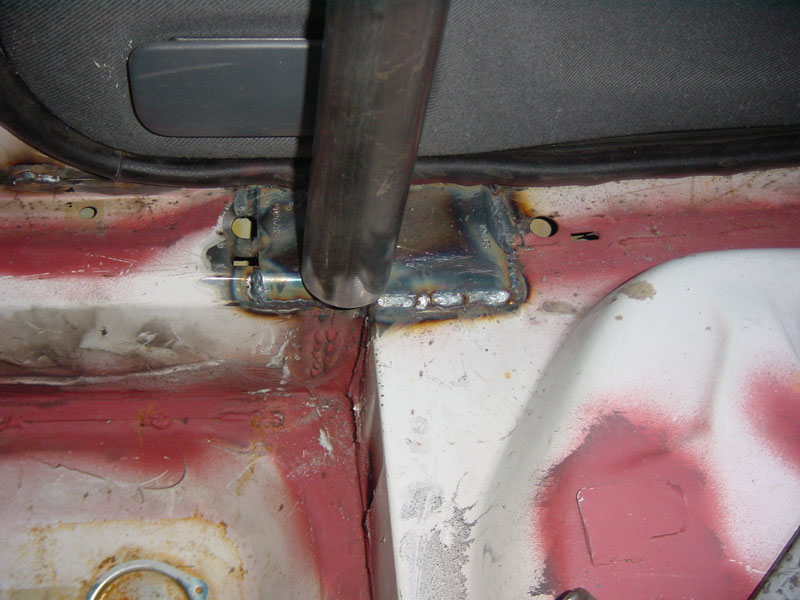
The leg should be in the middle of the plate – the “expander” came in handy again, and everything is millimetre perfect. Splendid.
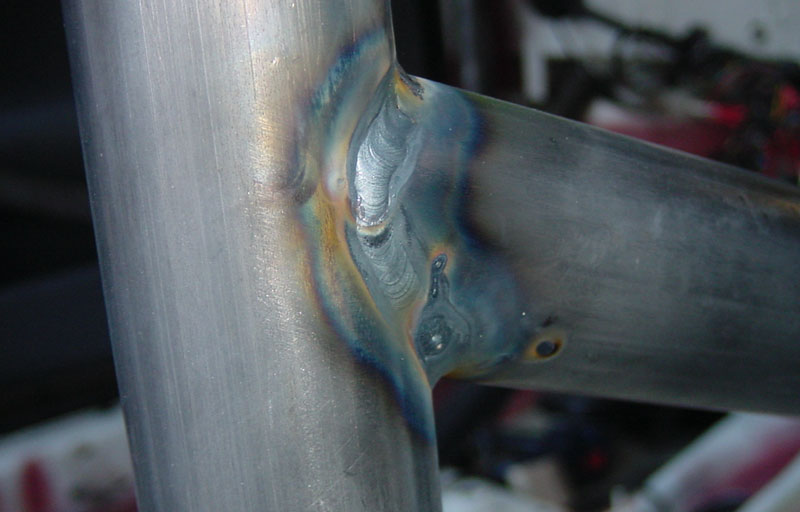
Next up, the door bars. These are an X-shape, made of one long tube running from upper rear to lower front, and then a “broken” tube which does the other part of the X. Again, careful calculation of the angles is one thing, but with tubes like this, they have to be right first time – there’s no “spare” length to play with, so care is order of the day. To get both correct took a couple of hours, but once welded in, they made the cage structure even stronger, and it’s only about half done. The welding is something I am quite proud of:
I’ve cut the shorter parts of the door bars, but today I’ve felt like death warmed up and been unable to do anything. Which is immensely frustrating as I’m working all weekend and the weather is going to be great. I just hope that I feel OK on Monday, and the weather is OK. The cage needs to be complete by the end of next week, or I’m in trouble.
Good news!
by Darren on Aug.07, 2007, under Build
Had a phone call this morning – Custom Cages have tested my test piece, and it passed! So I can get on and weld the cage in now! Hurrah!
… and there’s more!
by Darren on Jul.27, 2007, under Build
Today has been a bit slow because of a couple of issues that cropped up, and also because of the weather – in the afternoon it chucked it down like you wouldn’t believe. Unless you lived in England, when you would believe. Again, I’ve been lucky as many are underwater, and where I am it’s never going to happen, so that’s a bonus.
But the front end is coming on, albeit slowly, and more importantly, my TIG is coming along nicely. I’m not welding any of the main tubes in in the car until they’re all trimmed perfectly, and also when I’ve sent the test piece off – I won’t weld anything on the main cage until I get the go-ahead that my welding is up to spec by Custom Cages, although the tests I’ve done on some CDS tube I bought are looking good.
Anyway, here’s the front triangulation on the one side. Migged and looking very nice, if I do say so myself!
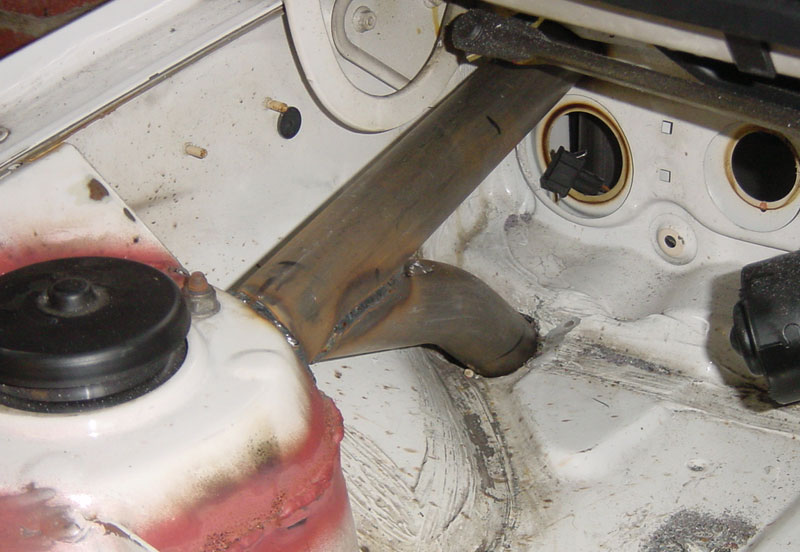
In addition the Group A engine I’ve bought has turned up, but sadly 2 of the 4 pistons are U/S, which will mean a sizeable replacement cost – I knew one would be, but on close examination another one is too. However, the head looks good, as does the cam, so not at all bad. But the car will be getting a standard engine first up, just to get it all in one piece and running and get the chassis shook down on the road. There is much work to do!
Long time….
by Darren on Jul.24, 2007, under Build
…. but finally, there’s been some progress.
The weather has been hideous, and I have to work outside. Today has been the first time when I’ve had all the tools I need, time and decent weather.
Progress has been slow – to make sure that everything will fit perfectly means tiny changes need to be made and then re-checked, and because the cage kit isn’t exactly, er, exact, I’ve had a lot of work to do. However, I’ve managed to get the front triangulation in on the driver’s side, and also trim the A-pillar tube (which runs back to the main hoop) and the main hoop itself – this alone was 10mm too long, and only once I’d gulped and then cut this off did it all start to fit in place properly. Because of the way the cage needs to be welded and fitted, the front triangulation needs to be done completely before the rest of the cage can be trimmed and then welded up. Once that’s done (the main hoop needs to be dropped to allow welding the A-pillar tube fully), the main cage structure can then be returned to its proper position and welded to the front triangulation, and all the other parts put in – door bars, tunnel brace, and then finally the end is done with the rear braces, etc, being fitted.
Which is a long way off, but I’m hoping that tomorrow the weather will hold off long enough for me to get the passenger side triangulation at least fitted even if the tube trimming can’t be finished off (this alone has taken a couple of hours – they had to be altered ‘cos the front part of the tube doesn’t sit totally vertical, so I had got it perfect…. and then had to do it all again!).
Based on my overall progress, the car will be finished in mid 2011. However, if I can keep today’s rate up, it might just be finished by the end of August. The cage, that is, not the car!
Finally….
by Darren on Jun.29, 2007, under Build
… the notcher has arrived. And I have bought a holesaw to fit it (a relief as I wasn’t sure I could get one to fit the thread, just a standard Starrett one though, bonus), and ordered some thin-wall tubing to mock the joints up on (to get the angles right before doing them on the real deal).
So next week (Monday) should see some progress, providing the weather holds off. The rest of England has been flooded, so I guess I should be happy that nothing like that has happened here.
There’s another bit of news, although far off. I’ve been accepted on the Plymouth-Dakar rally. This is a “banger rally” – you are supposed to get a car for £100 or less, and spend £15 preparing it. As it has to be LHD, this is unlikely at best. The idea is to drive the 3700 miles to Banjul (in the Gambia, a bit past Dakar), and then give the car away to be auctioned, with the proceeds going to local charities. In addition I’m planning on a bit of fund raising. If I can manage ?100 for 10km, I’m hoping I can make a couple of grand for the 6000km I have to do in a little car. Which will almost definitely be another Felicia, seems fitting.
Recce Ressurection
by Darren on Jun.04, 2007, under Skoda
There have been some doubts about us doing WRGB this year. Money is a bit tight for both of us, but this weekend we’ve decided we’re going to do it for sure.
Which means we’ll need a recce car. Handily the Felicia from last year has been at Paul’s since, well since we came back, so it’s been there for 6 months or so. Unloved. Unused. Unstarted. Unwashed.
But this weekend it became a bit more, er, urgent, ‘cos I had sold my Focus, and then on Saturday night, I sold the Fabia, which left me with no car to drive! So the resurrection began. Which was alarmingly simple – wash off six months of grime (which as I’d waxed the car before it got put away wasn’t too bad), change the forest tyres for something more suitable for an MOT (in this case the 048 Yokos I had as my tarmac tyres for the Sunseeker), and give it a damn good clean inside. And amazingly it passed the MOT straight off aside from needing the headlamps adjusted. It had a tiny split in the CV boot which needed superglueing up, but I’ll fix that properly soon. But I’m well impressed that a car that cost ?370, did all the WRGB stages (twice all except Crychan), and 1000 miles trolling about and then was left to die for 6 months can be as happy as larry within a day.
I just hope the rally car build goes as well – at the moment I’m STILL waiting for the tube notcher to arrive – the shell is largely welded up, so the cage is the next stage.
Weldathon, part 1
by Darren on May.29, 2007, under Build
My previous cars haven’t had much done to them originally in terms of shell preparation – indeed, basically nothing. This has had a couple of downsides, mostly in terms of long-term shell life – although seam welding does make a shell stronger and therefore stiffer (which is desirable for any car to handle properly), I don’t think I’m really in a position to tell the difference. Certainly, though, the Felicia was a lot less rattly than the Favorit was, partly because of the shell’s original strength and partly because the cage was fitted with tie-ins to the B-pillars, making it a bit stronger.
But this Felicia is going to be a bit different – firstly, the weld-in cage will brace to the front and rear suspension, which will make a BIG difference to the car’s strength, and for safety too. But it’s still worth seam-welding the shell, as it will make it stronger again, and also make it last a lot longer. And given my current financial situation, I can’t see selling the car in a hurry. Or ever.
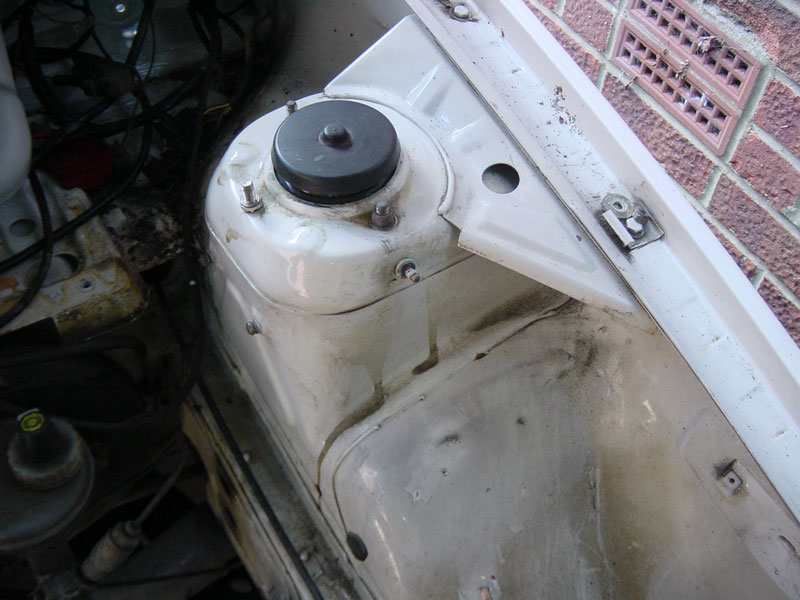
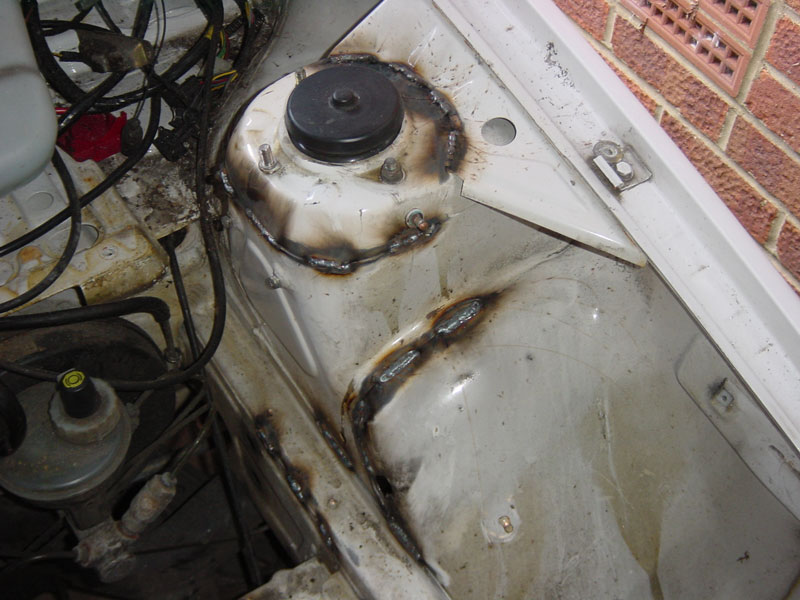
So, today I started on the seam welding. If you’re not familiar with the construction of modern cars, most are made with spot welds – usually every 2-3 inches there is a single spot (about 4mm in diameter) which has been welded. Seam welding augments this with a stitch of weld – basically about 50% of the seam’s edge gets welded. But before you can do that, you need to remove the seam sealer, which is a total cow of a job. It’s taken a lot longer removing the seam sealer (using an angle grinder with twistknot wire brush) than the welding has taken, but as you can see from the pictures, a fair old bit has been done. Firstly, in the engine bay, the strut towers and chassis rails plus engine/gearbox mount plates – before.
And after….
The floor needs plenty too – it’s remarkably thin and flexible, and strengthening this will also make the seat mounting more rigid.
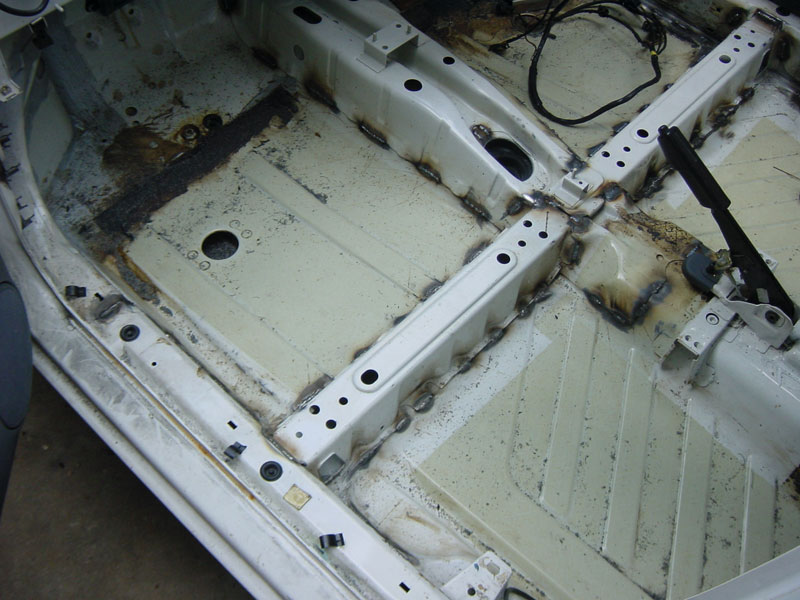
Basically, everything between the front and rear suspension will be done. This is the inner bit of the car, and the roof, etc., and then tomorrow the underside should be done too – this is mostly just the suspension mounts, etc., – the rest of the seams are accessible from above, thankfully!
And so it begins….
by Darren on May.22, 2007, under Build
Yesterday, two nice things arrived. My harnesses (Sabelt 6-pt ones with aluminium release – an ebay £200 bargain!), and the rollcage.
Well, I say “Roll Cage”, I mean “collection of bits of tube, some of which are obvious as to exactly where they go and should fit, while others are less obvious, and some are a complete mystery”. This situation is exacerbated by the lack of any picture/diagram/photo of an installed cage, which would make it mostly a piece of cake. The packing list specifically mentioned a set of photos. I looked for said photos. For 20 minutes, checking all the packaging, etc, three times. Phoned CC today, to find that there aren’t any photos of the Felicia cage as “not that many were installed”.
Oh good.
So, I’ve put some of the tubes in place in the car, but some of it is a mystery. There are varying levels of mystery:
Easy – height of the dash bar, direction of the door bars (one is full length, the other is two pieces)
Medium – the rear of the cage – the diagonal section and the rear stays – there are upper and lowers, and the lengths given are a little bit confusing
Hard – the tunnel brace and front triangulation – no idea at all about these at the moment.
I’m waiting for a phone call back from CC so I can pick their chief fabricator’s brain about this. Perhaps I was being a bit naeve, but I did expect a CAD diagram of the assembled cage – that would probably have answered most if not all of my questions….
I’ve got all of next week off, so hopefully by the end of next week there will be some progress. In the meantime, it’s just a pile of tubes and a confused / disheartened owner. You can picture that yourself!
Progress!
by Darren on Apr.30, 2007, under Skoda
OK, only a bit, but in a way it’s a big one….
I phoned Custom Cages to order the weld-in cage kit, spoke to a very helpful woman who was professional and made a huge change from the miserable, unhelpful “Stuart” who I spoke to at Rollcentre. She took my details, the cage info, etc, and took my money. And then told me that delivery would be “7-10 days”, which I did a double-take at. Everyone else said around 8 weeks! So, that’ll be nice – it might be finished before WRGB 2007!
Progress?
by Darren on Apr.29, 2007, under Skoda
Well, I finally ended up putting N158 UBD on eBay, and it sold for ?2050. It’s just been picked up by it’s new owner, Andy Pecover. Had to be packed to the brim with the spares I was selling with it (he was driving it back), so for the first time in 3 years I don’t have a rally car.
But I do have the money to go on a spending spree – I can spend the money from the old car in about an hour, I think…. I have to order the rollcage (more on that when it arrives), extinguishers, sumpguard, all sorts. The plan is to have it built by around September, but we’ll see how that goes.

