Build
A few little things…
by Darren on Aug.31, 2010, under Build
Today was all about making sure the car would be ready for tomorrow – as I can tax it tomorrow and drive it on the road, and therefore get some rough mapping started. There were a few odds and ends to sort out on the car, none of them that important, but each one needing to be done in anticipation of tomorrow, including changing some bolts for the right ones (rather than temporary changes I’d made to get the car running), getting the brakes working OK, changing the wheels for gravel ones (in anticipation of RallyDay aside from anything else), and checking everything that has already been done, such as the new suspension (remembering that I’d forgotten to do one of the spring collars up). And then, seeing if the car would still move itself – it hasn’t done that for a long time. I decided to start out with the same map settings we used for Rally GB 08, rather than what I’d done afterwards, as much of the engine is the same, and I’d think it probably will be similar at low revs. And this seemed to do the trick – the car drove perfectly up the drive, and on my, er… private test track of 100 yards or so. So I gave the car a good clean for its good work. Tomorrow will be much more demanding!
And up again.
by Darren on Aug.30, 2010, under Build
After yesterday’s defeat, it was time to address the problem – I’d double-checked everything so I was sure the cam timing was right, the clearances all adjusted, everything else that could stop the engine wasn’t a problem, so the crank sensor must be the problem. I got a timing light onto the car, and turned it over – and saw straight away what the laptop had said – the ignition timing was indeed all over the place. The crank sensor was either faulty or just not in the right place – turned out that there was a but of rust on the end of the trigger, and it was also slightly in the wrong place, and the two meant that the ECU was getting a signal it just couldn’t deal with. A couple of attempts saw it lined up perfectly, and suddenly a rock-solid ignition pulse showed on the front pulley with the timing light.
I reconnected the injectors, and….
… it still wouldn’t start! It sounded more regular, but still didn’t want to go; it was willing but unable, basically. I took the no.4 spark plug out to see what it looked like, and it had fuel on it, so that wasn’t the only issue.
But then as I was re-attaching the spark plug lead, I realised what had happened. When I’d reconnected the leads, I’d swapped leads 3 & 4 over – on the old set of leads they were easy to spot, but now 3 & 4 are the same length, and I’d got them the wrong way round. Hurried round, paused for a second (in a “I really hope this does the trick” way), and turned the key….
Instantly, it fired up! Sounded good too. Seemed lean, though, as it died quickly after (the ECU has a “priming” effect where it injects more fuel just as you turn it over to get it going), but that is good news – the new head and manifold should let more air in, so you would expect it to be lean at this point. Fired it up again, and managed to keep it going this time – it sounded keen, and also mechanically good, so that’s a great start. I can’t do any mapping until Wednesday as the car needs to be on the road for that, and it’s not taxed at the moment, so tomorrow will be spent checking everything over, and finishing off a few little bits here and there, but it is currently looking good.
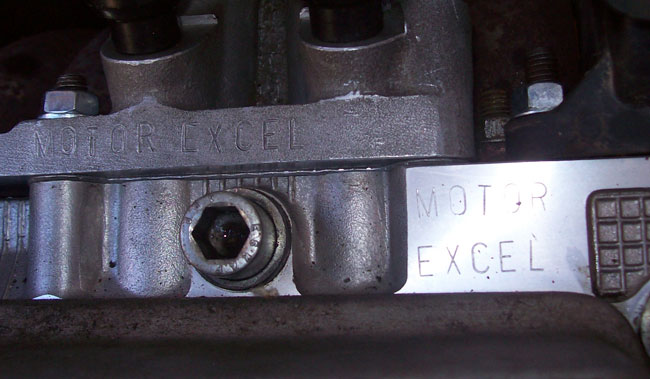
Always good when a company puts their name on their product – but the proof of the pudding is in the eating.
Up and down…
by Darren on Aug.29, 2010, under Build
So, with the trauma of total engine removal out of the way, it was time to get everything back in place. Most of this is just straightforward stuff – obviously the driveshafts, gear linkage and cooling system, etc., are all unchanged, so are a piece of cake to put back on – particularly as they’ve been done so many times that everything is nice and easy – with the grease trick, even the driveshafts only elicited one expletive.
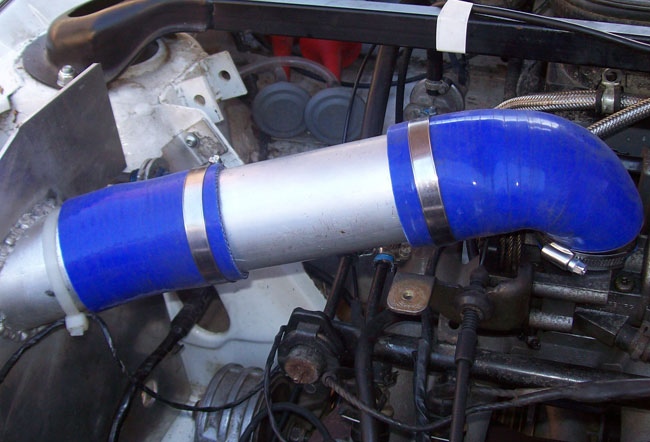
But of course there is the new manifold to put in place – and this is an unknown; it’s not just a manifold that you bolt on, there are all the bits that fit onto it – I was expecting to need to modify the fuel rail and so on, but I needn’t have worried; everything standard fits perfectly into place, which was a real relief! Almost seemed too easy. However, the one thing that was left which wouldn’t bolt on (and nor would I want it to) was the air inlet – the standard Skoda item is an odd shape and has always looked a bit restrictive (and indeed has made a dramatic difference to the way the car runs whenever it’s there, so I guess it must do). In addition, the mini-kit manifold doesn’t have the mounting points for it, so it was bin time. Fortunately I’d planned ahead and got the right sizes of silicone tubing and elbows to fit, and there’s just enough room to get it all in there – it looks like some kind of Max Power turbo jobbie now with blue silicone tubing and aluminium as well.
Time for fluids – oil, gearbox oil, water, and double-check everything. I disconnected the coil pack and injectors and turned the engine over on the starter to let it build oil pressure which it did quickly enough (it’s got to fill the oil filter and all the galleries, so I’d rather do that at low speed with no load on anything). And then…. time to see if it would fire, so I reconnected and turned the starter.
I wasn’t ready for what then happened – it didn’t fire up. In fact, it sounded really bad – it was popping in the inlet, and sometimes slowing down suddenly, like the timing was off. I got the laptop out, and connected it to the ECU, and tried again with the DTA diagnostics page on. It showed the engine speed jumping around all over the place, which would make sense – the ignition timing was clearly not right because the sensor wasn’t working properly. By now the battery was flat and I was feeling pretty deflated, so I left it – being a Sunday afternoon the shops were now all shut (Bank Holiday weekend), and it was best just to leave it rather than carry on – one thing I’ve learned is that desperation and tiredness don’t usually elicit a good outcome!
Nice and simple…
by Darren on Aug.28, 2010, under Build
… is how today was supposed to be. In essence, remove the old manifold and cylinder head, check the height of the pistons above the liners (which should be 0.6-0.7mm), and then put the new head on, put the manifold on, make all the right adjustments and then fire it up. Easy.
So, I got started fairly early, and removed the old inlet manifold and the exhaust, and then it was time for the head to come off. Basically, undo bolts, easy enough. I’d drained the water out of the engine yesterday, so it was all nice and dry, and all went according to plan. Once the bolts were undone, the pressure of the cam on the two open valves in the engine meant the head was already pulled away from the block, and nice and easy to lift off. I took it off and put it in the garage. And noticed something unusual – usually the head gasket stays with the block, but this time it was stuck to the head. Fair enough.
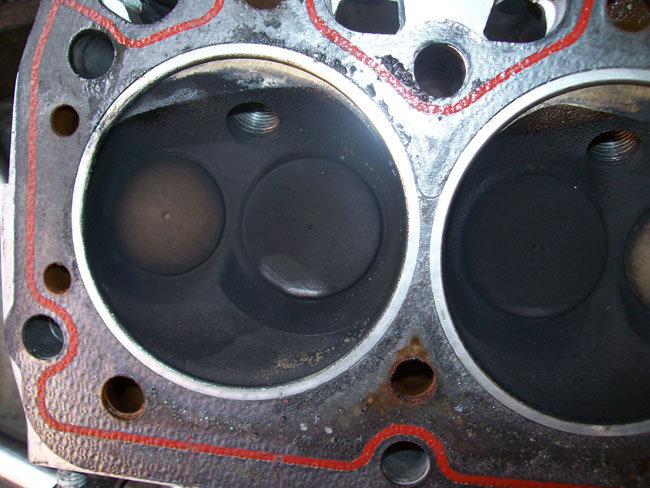
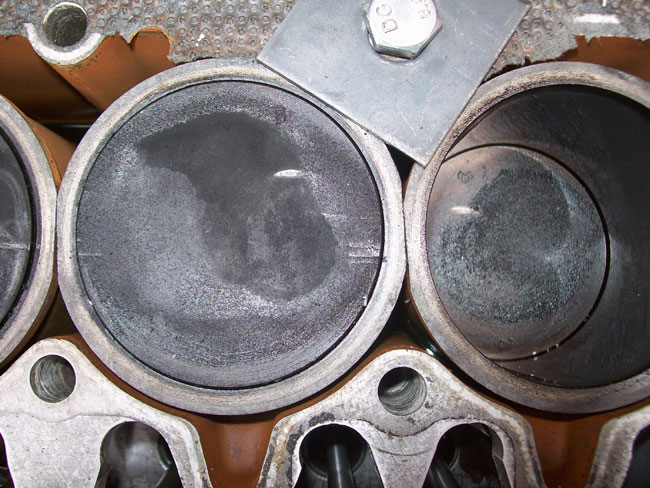
Then I went back to the engine, and thought I must have been seeing things – the gasket wasn’t on the head, it was on the block. Had another look at the head. That had a gasket too. There were two gaskets fitted to the engine. Alarm bells sounded. Those of you who are regular readers will know this engine was bought early in the year (when it was snowing), and installed with the help of a friend ready for the Sunseeker, and wasn’t run that much – just to check that it fired up – as it was time for mapping when I became incapacitated. So this engine hadn’t done a lot of running. And it had never really run right, it seemed a bit lumpy. And I guess I was seeing why now. I went back to look at the head, and noticed something else which wasn’t right – the edges of the inlet valves were shiny, which made it look like there had been valve/piston contact.
So I then took a look at the pistons to check them. Same story there – shiny bits on them, where they had clearly been hitting the valves.
So, this wasn’t looking good at all. Time for some measurements – the head builder told me that ideally there should be a 0.8mm clearance between piston and cylinder head, and a compressed gasket it 1.5mm. So I’m looking for the pistons to be 0.6-0.7mm above the liners. I got the verniers out, and measured…. 1.2mm. Clearly not going to work either. I then took a closer look at the pistons, and they seemed to be very loose in the bores. Plus I had no idea what the problem was with the camshaft – it could be the timing was a long way out leading to the interference between the valves and pistons. In short, looks like I got a complete pup. And more to the point, time for a different bottom end – there was NO WAY I’d risk my new head (which cost over £1000) on this. Fortunately, I have a couple spare!
From the shed, up came the engine that did Rally GB 2008 – this was a good engine which ran well but was limited by the head and inlet manifold, so I got the head off and measured the piston protrusion – spot on at 0.6mm. Then did a dummy build with an old gasket (handily I have a few about) and the new head, to check valve to piston clearances with some plasticene on each piston, plus also getting the valves set up and checked. Only takes a second to write the sentence, takes about an hour to do. But all was good – had a 0.92mm clearance to the head, which isn’t exactly right (being 0.12mm wider than spec), but is good enough, I think. Then did the real build with a new TEMAC gasket, torqued everything up, and then transferred all the studs into the new head (which again, quick to say, a while to do). The engine was pretty much ready to go in, but of course next the other one had to come out. I’ve obviously done this a fair few times, so it’s fairly straightforward, other than the fact that I have a sling that I use that is usually attached to the head… which was missing, so getting the engine out wasn’t that smooth.
Split the engine and box, and then fitted it to the new engine. I did this with the engine on a stand (I made a few up for storage purposes), which made is SO much simpler than before – usually this is a really annoying process, but with the engine held firm and square, it was dead easy. And as if by magic, Kevin appeared – up to this point, Mum had been helping with the two-man bits, so was glad to be relieved of duty. With the engine now in place, and the sling set properly, getting the engine back in place was dead easy – everything lined up easily, and it bolted up without any drama.
At this point I needed to stop because I have my bike up for sale (which is how I’m paying for the cylinder head or the entry to Rally GB, depending on which way you look at it), so I wanted to tidy up before he came over. Thankfully that paid off, so I have the money for the entry!
Tomorrow, everything else will be put back on, and hopefully in a position to fire up – the silicon hoses for the air intake arrived this morning, so it seems everything is in place, albeit with a lot more work than expected. Here’s hoping it pays off.
Head and manifold have arrived.
by Darren on Aug.25, 2010, under Build
At last, the biggest parts of the solution to the lack of speed have arrived. A new cylinder head and inlet manifold, which will hopefully transform the performance of the car. Up until now, the engine’s performance has been limited by the parts available to me, and the biggest restriction has been the inlet manifold, which turned an originally quite quick engine into a somewhat muted one – it just couldn’t flow enough air, meaning that in the upper rev range the engine made less power than it should do, and instead of having a satisfying power band, it just petered out like a damp firework.
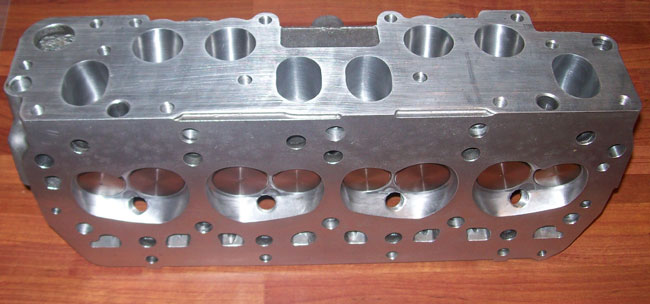
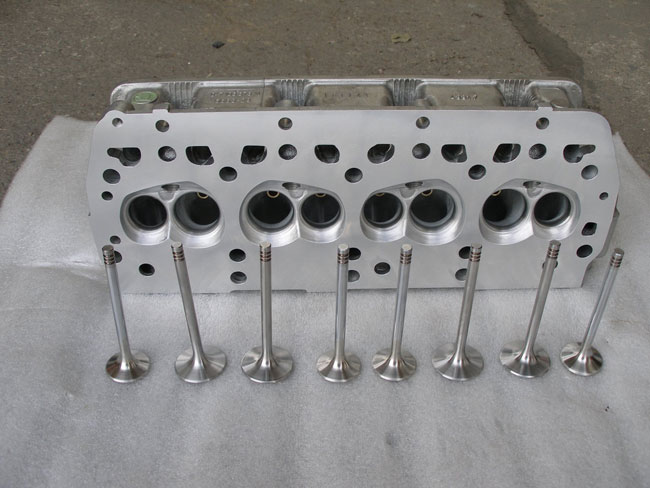
Today’s arrivals should change all this – a brand new cylinder head which has been fitted with larger valves (which are legal due to a homologation extension that Skoda filed in 1999), which would already make a big difference, but allied to the extensive porting work that has been done and combustion chamber modifications should lead to an engine which is much more powerful. This has all been done by Motor Excel in the Czech republic, who have a good reputation (having built 1.4 mini-kit engines which produce over 150bhp!), and who have been excellent throughout the entire process – the only two british head builders who responded to me seemed to be less than keen, and would have charged me nearly as much for ‘development time’ as I was charged for a complete, brand new head, and one which looks to have been modified with great skill.
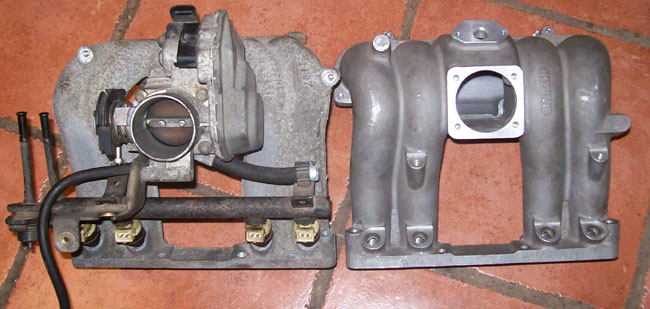
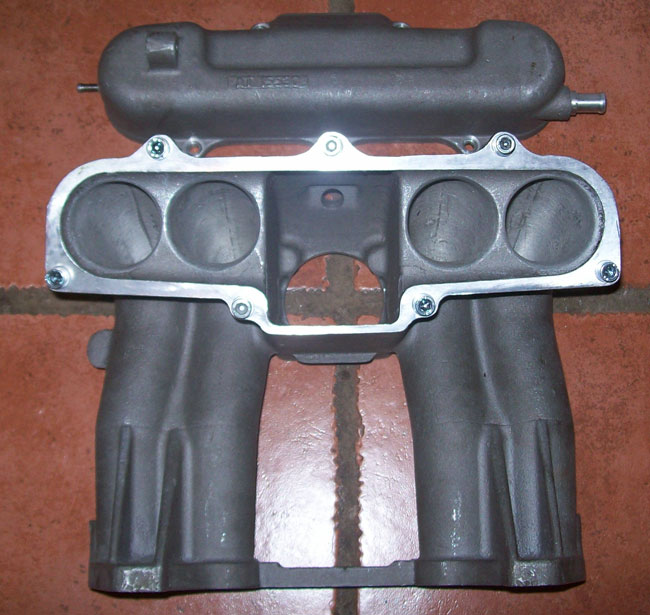
The head will really shine when fitted with the other part, the ‘mini-kit’ inlet manifold. This is a much better design than the standard MPi item that the car has been running since being built (and indeed the previous Felicia did as well), which has much larger port runners, and a less convoluted design – notice how the ports runs are much straighter than the curvy ones on the MPi one. You can see the difference between the two manifolds when they are side-by-side – the new one is on the right, and looks like the steroid-consuming brother of the positively wimpy MPi unit.
It’s also in two pieces which allows hand-finishing to perfect it; the original MPi unit design made this impossible, plus the runners increase in diameter as they get towards the ‘plenum’ area (unlike the original, which was at best parallel; I cut one apart once to see what was what inside, and it didn’t make for good viewing!).
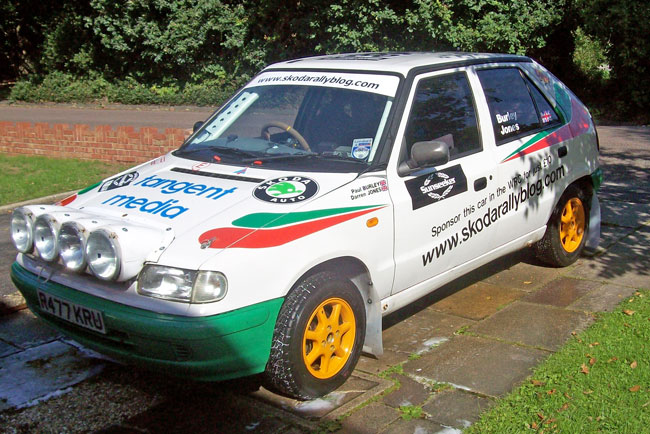
There are still other parts to get hold of – I have ordered the right throttle body for the setup, and then I need to arrange the air intake to suit this setup (which hopefully will be off-the shelf silicone hose elbows and connectors) but this will be a big improvement in the car. And you’d hope so, given that these two items alone cost me about a month’s wages (no, really), and to put that in perspective it is also about 50% of the original build cost of R477 KRU. This, the new suspension and new diff will have about doubled the cost of the car since the last time it was driven in Rally GB, but should mean it is an altogether different proposition on the stages.
Front suspension, Part 3
by Darren on Aug.16, 2010, under Build
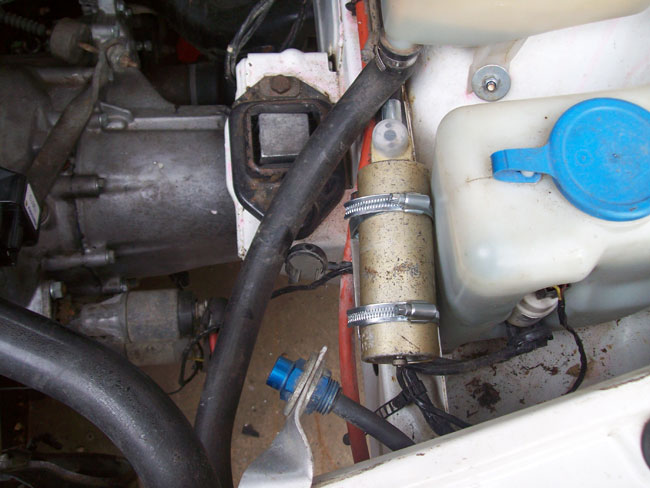
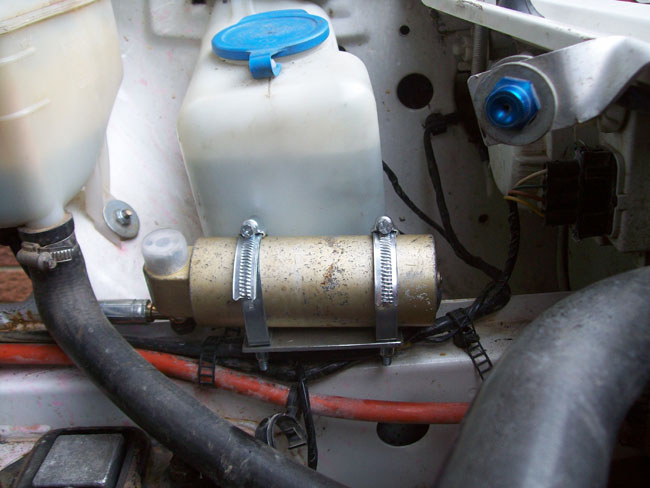
Today I’ve finished fitting the Proflex front suspension to the car – as the right hand side involved getting everything worked out, the left hand side was a lot easier, with the only real issue being the placement of the remote canister – while the other side had been very convenient, this one wasn’t, so I had to make up a U-shaped bracket to sit on the chassis rail to support it while avoiding all the other stuff in that area – again, a simple thing, but it took quite a while to make it. However, it’s now all done, so the car will be back on its wheels tomorrow morning.
In addition, here’s a quick teaser of the new head, which I’ve been sent – still waiting for the head itself to arrive, it should hopefully be here by the weekend.
Now this will be a step up.
Front Suspension, part 2
by Darren on Aug.13, 2010, under Build
Well, it could be more. It certainly seems to have been going on a while, but in between doing the car there have been other things to do, like work(!) and also replacing the garage roof (the garage isn’t big enough to get the car in other than just to put it in there, and there’s too much stuff in there at the moment, in case you’re wondering why I work on the car outside).
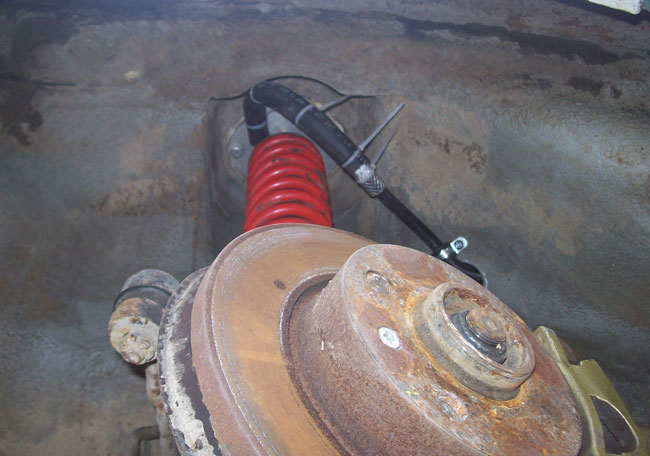
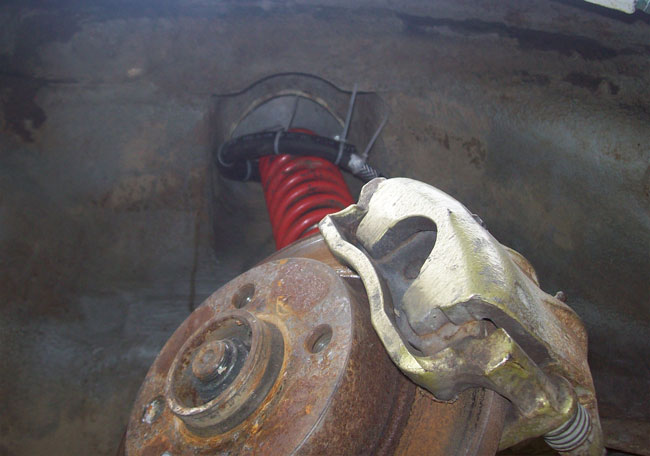
Anyway, I’ve made more progress on the front suspension – last time out the hole was drilled, but there was a problem – the hose from the top of the strut to the remote reservoir would foul on the inner arch or the spring, and it took a fair bit of messing about to get it all lined up properly so that it will not rub or have a very short life. These are the kinds of things that you’d think take minutes as you’d “just bolt it on”, but getting it like this probably took 3 hours or so of messing about!
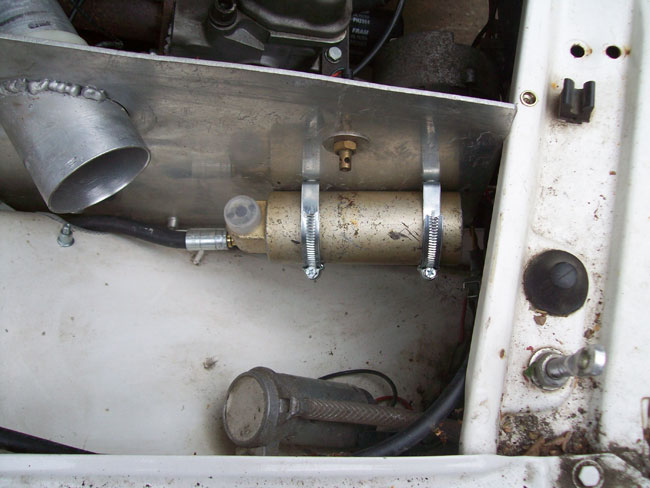
Yes, the cable ties will be trimmed – they are holding a larger piece of hose which is protecting the real hose from damage (thanks to Chris Rice for that tip). I’m pleased to say it seems to have all worked out nicely. In fact, even better than I thought – the reservoir can be sat in the ‘air box’ area, rather than in the engine bay so a) it won’t be in the way, and b) it’ll be nice and cool. In addition the reservoir is located really firmly on a couple of captive jubilee clips, so it almost looks proper!
The left hand side has been drilled, and the strut is in place (much easier when you know the position to put it in), but I can’t finish that side as I’ve got to wait for the paint to dry on the huge hole in the inner wing. And it’s started raining again! Still, as it stands the car is nearly ready to go on the Proflex.
Engine-wise, things are still progressing – the head should be here fairly soon, then it’s bolt on and mapping, and that should see the majority of things covered – the only other thing is that there’s a change to the seat mounting regs from last year, so I need to change the way my seat is mounted, which will probably take a morning – there’s nothing wrong with what I have at the moment, it’s that the FIA mounting rules are different, so that’s what needs to be done. Joy.
Seat woes
by Darren on Aug.10, 2010, under Build
Unfortunately there has been no progress on the car today as it’s raining, and I’ve not got the EZ-up in the drive.
However, something has happened – Paul’s seat is a Cobra Imola, which is FIA approved (as it has to be for International use), and it’s 5 years old. The FIA’s rules allow a seat to be returned to the manufacturer for examination and recertification to give it an extra 2 years life. I just phoned Cobra to arrange this to be told that they don’t recertify seats. So a seat which has seen maybe 20 days’ use (if that) and which cost £300 is now no use, and I have to replace it.
Nice customer service, Cobra.
Front Suspension
by Darren on Aug.09, 2010, under Build
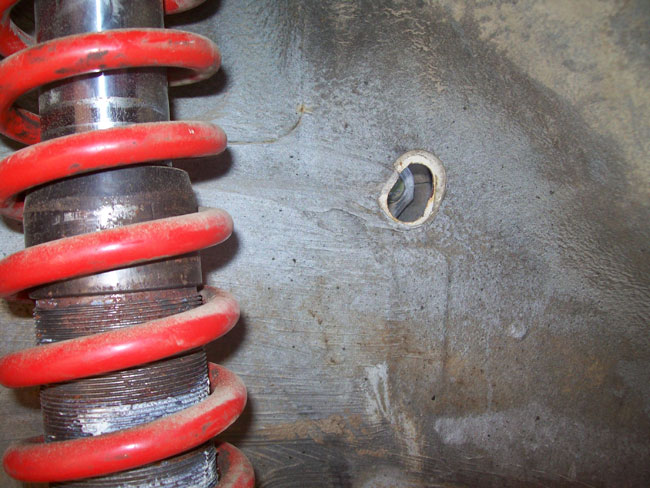
So, the back end was easy enough, but the front… is a slightly more involved affair. This is mostly because of the remote reservoirs for the new suspension, which are an important part of it, giving much bigger oil and gas volume, and allowing a thermostat to be placed away from the suspension, giving consistent performance. That’s all lovely, but they need to be placed somewhere, and that’s where the fun began. On newer suspension systems, they come out of the top of the strut, making them fit easily in the engine bay. But on these, they appear under the top mount, meaning that they are under the wheelarch. Ideally, the reservoir should be in the engine bay for a number of reasons – cleanliness, adjustability and also avoiding damage. The strut needed to be carefully placed to stop the hose from fouling the inner wheelarch (which took some time), but the next issue was finding a way to get the reservoir under the bonnet. And here’s the problem: The reservoirs are quite big. Which means a big hole. So, what started out looking like this:
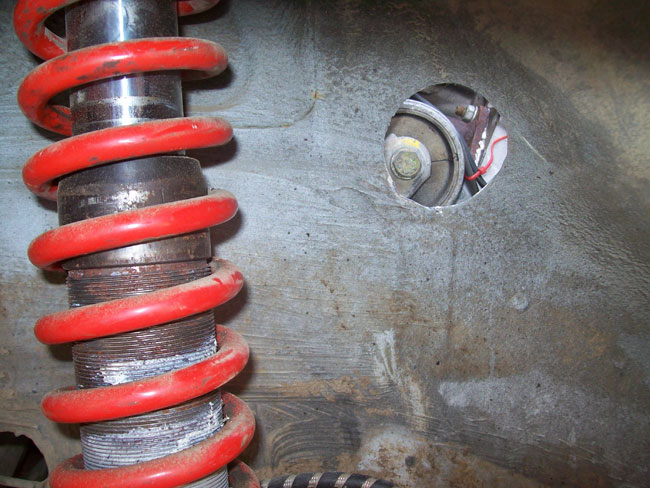
Needed to be much bigger:
Which wasn’t that easy to do with a holesaw, but did look fairly neat after some tidying up. The reservoir can now live inside the engine bay, on the filter cool air box wall, although the hose needs to be fixed in place to stop it doing something silly. However, no progress has occurred today, because I’ve been doing something else – the garage roof had started to leak in the rain, and needed replacing. I couldn’t afford to have someone else do it, so I did it myself with the help of a friend, and it took the entire day. Hopefully there will be more progress tomorrow, with the left hand side getting done, and the car finally sitting on the Proflex all round…
Work starts in earnest
by Darren on Aug.03, 2010, under Build
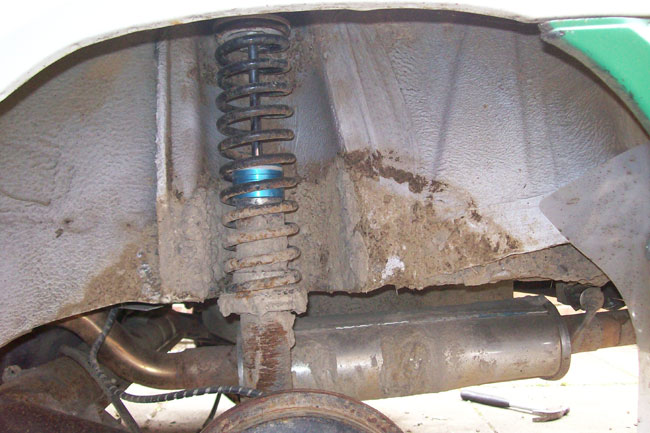
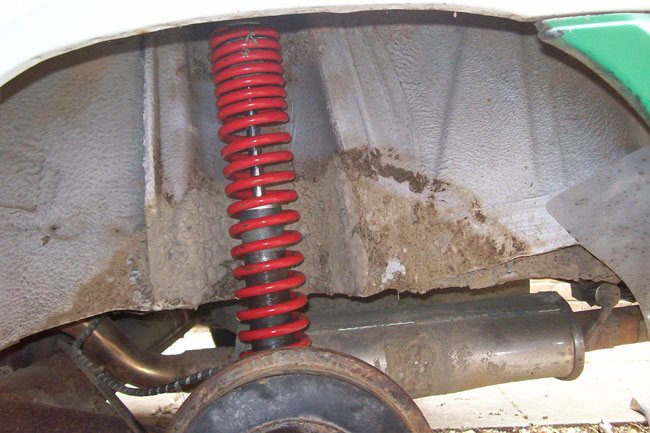
Over the last couple of weeks, I’ve been unable to put any time in on the car – this was mostly due to work commitments, but at weekends I’ve been unable to due to one thing or another (such as actually going on holiday for the weekend, heaven forbid!). However, I now have three weeks off, and have lots of things to get on with. This morning was a bit of a dead loss, but this afternoon I managed to put an hour or two in on the car to get the rear ProFlex finally fitted to the car – it should be a straightforward fit, but of course it wasn’t, mostly because the bottom bolts were rusty and bent (!), so it took a LONG time to get them out.
However, putting the new ones in was, of course, simple. New bolt underneath, and a new locknut on top (another odd size meaning another eBay purchase), and 10 minutes later, it looked like this:
The next job will be locating the remote canisters – these will sit behind the rear beam, but the left-hand one’s hose runs near the exhaust so will need to be suitably protected – I feel another eBay purchase coming on this evening. Tomorrow will be the next big decision, where to fit the front ones; I think I will probably mount the canisters under the wheel arches, but then maybe I’ll drill some big holes in the arches instead and have them under the bonnet.
However, this is only the first thing. The next is bigger. MUCH bigger. For quite a while, I’ve wanted more power. On Rally GB 2006, the car was fine on the flat and downhill, but uphill was slow. Spelled t-e-d-i-o-u-s. Just a lack of power meant that anything more than a slight incline and the car would struggle; remember that it’s driving through mud and gravel, not on flat tarmac, so the power gets sapped everywhere. But the problem? Aside from a lack of money, there just aren’t many options for tuning in the papers; the car needs to conform to the rules set by the FIA, and that means conforming to the specs submitted by Skoda. Some manufacturers offer a wide range of alternative parts, meaning that on a Group A (or even N) car you can have all sorts of legal go-faster parts fitted. This wasn’t the case with Skoda; unless you had a “Kit” Felicia (which featured an engine with individual throttle bodies, leading to less restriction on the air going into the engine and therefore more power), you had very limited options, and that was what I was working with.
Or at least I thought so, given the paperwork I had. What I didn’t realise is that after my paperwork for the car was produced, Skoda had homologated more parts for the car. Specifically, a tubular exhaust manifold, bigger valves in the head, and a bigger inlet manifold – a similar design to the one I was using, but much less restrictive. How much? Well, the standard car is 68bhp. Tuned versions are making about 150bhp! Obviously this is for a full-race engine, but it shows that there’s much more potential there. The problem is the manifolds are like hens’ teeth – the guy who told me all about this (and sent me the papers to prove it) said it took him a year to get hold of one. I’ll cut to the chase – a number of ads placed in Czech (the wonders of Google Translate) and some research has led me to a tuning company who have a manifold in stock, and are currently making a new cylinder head with bigger valves, with everything matched up to suit. This should lead to a much more powerful car, as the main restriction is in the head. In addition, a tubular manifold is now OK on the car, so that’ll be fitted in due course as well. The main problem is that I’ll have to wait a few weeks for it – it may not arrive until after I’ve finished my holidays, alas, but should be a straightforward fit-and-map job. I can only hope, anyway.
