Build
Up and running
by Darren on Dec.18, 2011, under Build
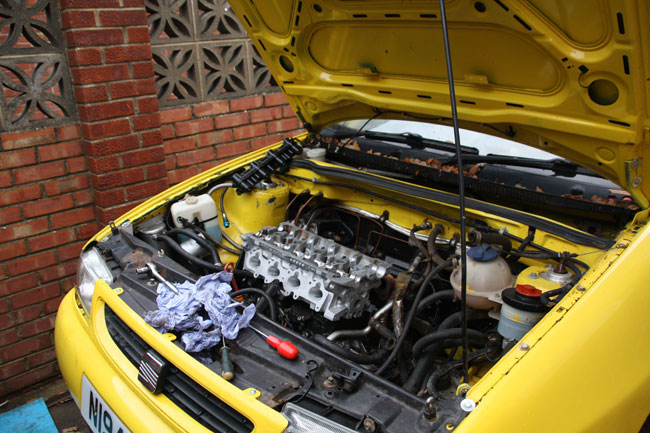
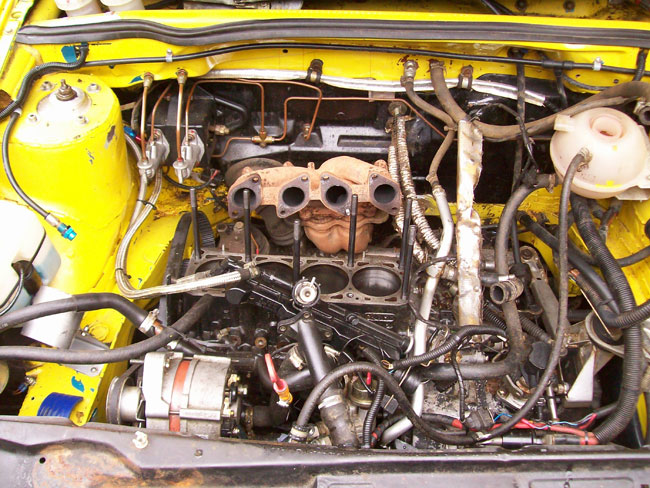
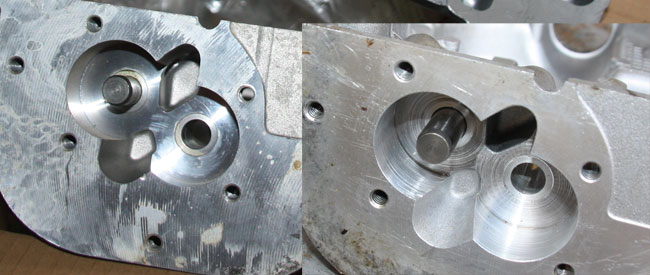
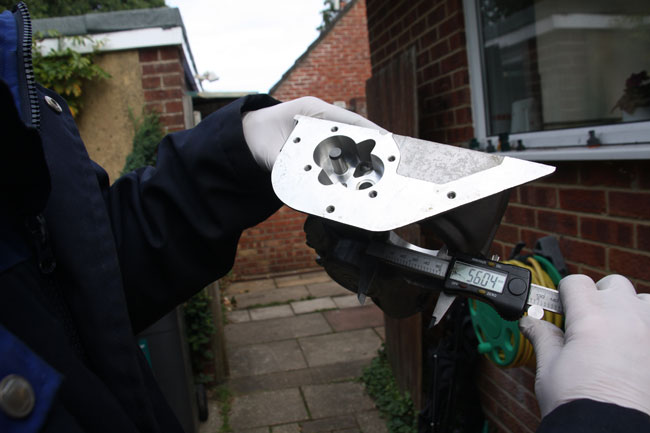
After the problems with the head, there was more work to do than before – first up was to check the ‘insurance’ head I bought a while ago on eBay – it hadn’t been very well packed, and cylinder 3 had two valves open on it (as it still had the cams in) and I was worried they may have been damaged, so they needed to come out to be checked, which fortunately showed they were in good condition. In addition the machining in the ports on this head was a lot better than on the original head the car came with, so clearly VW cleaned up their act on them. Next, the ported head was taken off, and everything readied for the new one to go on, which went pretty smoothly. Fortunately the car has ARP head studs fitted, so they don’t need replacing each time you fit the head. Unfortunately although the head gasket looked mint, I didn’t want to risk it so replaced it anyway. £25 well spent there then.
Next up, I needed to check the cams’ timing, as they are adjustable with verniers and need to be set spot on. Long story short, 2 hours led me to make measurements that were accurate enough to know I wasn’t a million miles out, but not accurate enough to know if I was a degree out or not. But certainly good enough for the time being.
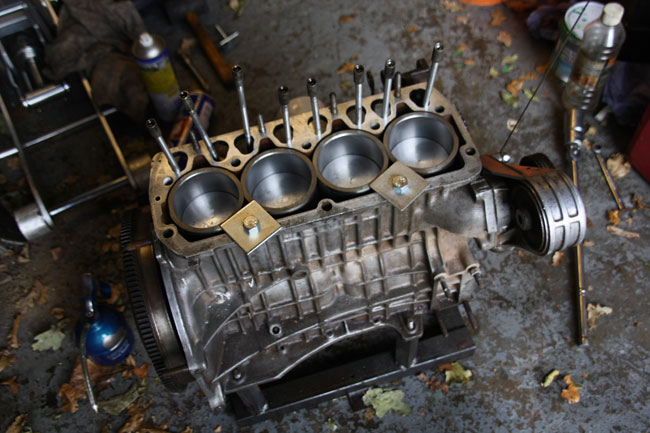
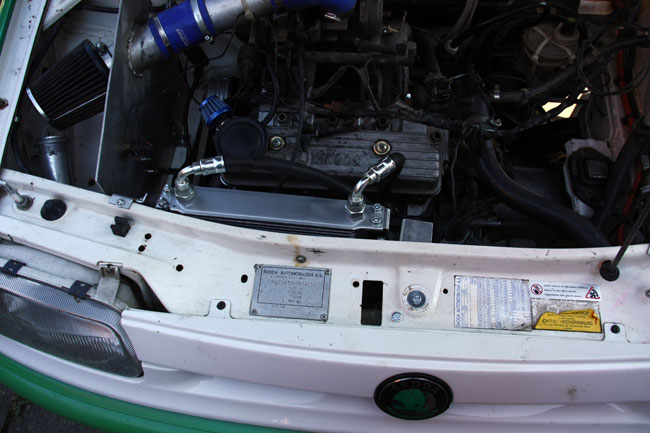
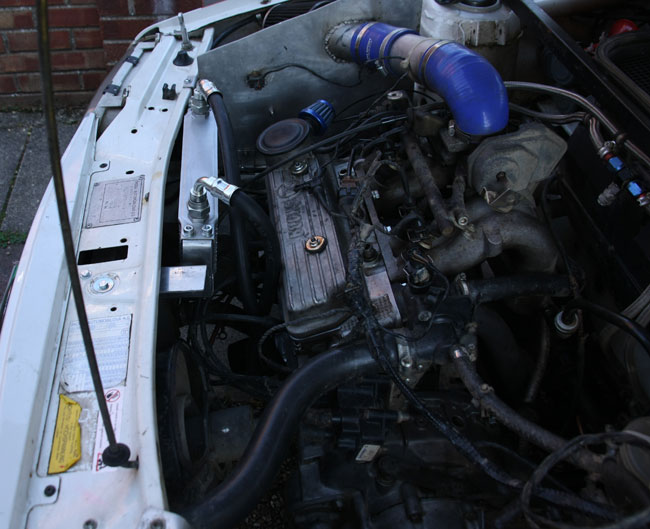
Now came the lengthy process of bolting everything back on. On the Felicia this is a piece of cake – it’s a very simple engine, and as I’ve done it so many times I know it inside out. But with the Ibiza it’s a different kettle of fish; I dismantled it ages ago, and it’s the only time I’d ever seen it. So progress was slow and it was quite a game of Mechanic/Detective. Most of the electronic things are fortunately easy enough to do, but some of the mechanical bits needed a fair bit of head-scratching. By Sunday night, however, it was all back in one big piece, albeit minus the exhaust and power steering pump drive belt. So I thought I’d try to fire it up to cheer me up a bit, but alas the battery was flat, so no dice at all – enough to turn the lights on the dash on and run the fuel pump, but no chance of turning it over. I put it on charge and put it all to bed for the night.
Clearly it wasn’t the Skoda…
by Darren on Dec.15, 2011, under Seat
… that was cursed. By now, I should have a running Ibiza, and have it ready for the MOT. And therefore for Longmoor Loco. But as you may have surmised, I don’t. I’ve had a long delay with the ported cylinder head – the company doing it said they’d done one and then found a crack on final testing, so another one was needed. During the long wait, I had bought a standard head on eBay (just in case), and then the guy who was sending it forgot to mention it would be another week before he could send it. Great.
Anyway, on Monday the ported head arrived – unfortunately I was out at the time (helping a friend of my Mum with a problem with her car that turned out to be a blown head gasket), so didn’t get it until gone 5pm. I got it all unpacked and ready to fit, and then on Wednesday started looking at fitting it. I’ve never timed up an engine with two cams on it before, so a bit of research was done before I got started, but it all seemed simple enough, and having a spare head with no valved fitted made it easy to check out what was going on. Next up, time to get the cambelt off and everything ready to fit, which sounded simple enough, but took an hour or so to get it all done and the timing marks checked properly. And time to bolt the head on, which was easy enough – the engine has an ARP stud set fitted so it was nice and easy to put on, and it all torqued up easily enough.
Unfortunately I then had to ‘pop out’ for 3 hours or so to check out a replacement car for my Mum’s friend, so that was half the day taken up, and then time to put the exhaust on, which was easy enough too. And next up, the camshafts. The studs for all the cam caps had been removed for machining, so it’s a laborious job to put them on, so while I procrastinated for a bit, I decided to check out the camshaft caps. And found a problem. A big one. One of the caps is from another head. They are all numbered, and when they are made, they are bolted in place and then bored; it’s not possible to get a spare one as they are machined as a set (head and caps are matched). The ‘replacement’ one was from another engine, and nowhere near right – it’s about half a mm out of line at the parting line.
So far I’ve heard nothing in response from the company that did the porting, via email or phone. Great.
However, today the ‘standard’ head has arrived. So it looks like Saturday’s work will be to remove the head, get the standard one fitted and see if I can get the car running. I’ve also been to the machinists today to chase up the brakes which I’m having reground because they had some water damage (these were brand new AP discs), they should be ready on Monday. I have most of next week off (well, 3 of the 5 days), so hopefully it’ll be up and running soon enough, but getting it MOTed in time looks like a real stretch. We’ll see…
On the upside, I have tarmac tyres fitted to enough Skoda rims to do the event anyway, so plan A is all looking fine anyway.
Bits and pieces
by Darren on Nov.20, 2011, under Seat
A quick update. Firstly, I have a confirmed entry on the Longmoor Loco stages, which is held on the 30th December. A 2WD-only event, it’s always popular and is apparently great fun. It’s going to be my sister’s first event as a navigator, so it should be a laugh if nothing else!
Next up, I’ve done a bit of work on the Seat this weekend; as mentioned before both sills had some damage, which was really accumulated stone damage which had then been left to rust a bit; all surface rust really, although the rear half centimetre or so of each sill had a little hole in it, so I made up some nice repair sections and have welded them in, then cleaned up the entire sill and they’ve been painted. It’s very handy that Cupra yellow is pretty close to Hammerite yellow – later on I will paint them with the correctly-coloured paint but at the moment I’m more worried about protection than aesthetics. The sills could do with having fibreglass guards made up, so I may take this on as a project at some point, particularly as I have a bunch of matting left in the garage from another project.
I’ve got a flowed cylinder head coming the weekend after next, so with any luck the car will be up and running soon, which will be good; I’m really hoping to get it all done and MOTed before Longmoor, and if possible I may do the event in that, but more than likely it’ll be the Skoda. But alas another week of work beckons, so little if anything will get done until the weekend, other than the Terratrip 404 which I’ve removed this afternoon to check it over; it seems most of the buttons don’t work well and it beeps constantly so I’m going to see what’s going on with it!
I am a traitor.
by Darren on Nov.17, 2011, under Seat
In a decidedly non-chronological manner, I am now going to bring you up to speed with a new project, something which the eagle-eyed may have spotted in the odd photo here and there, and that’s that I’ve bought another rally car. I am a traitor, however, as it’s not a Skoda!
First up, at the moment I am keeping the Skoda; I’m still on for doing Rally GB 2012, and the Skoda is the car to do that in, as the new car’s homologation would have long expired, and it’s not in a homologated spec anyway as far as I can tell. I also still harbour the idea of doing an IRC round at some point (although as the Monte is back in the WRC, that pipe dream has fallen by the wayside). But in the summer I had saved up about £2000, which I was going to put towards a new bottom end in the Skoda; this would have covered a 1.4 conversion, better rods and forged pistons, so the bottom end would be good for 8500rpm or so, and allow the head to fully perform; it would have hopefully gained me about 25-30bhp or so, and made the car a bit of a rocket for what it is.
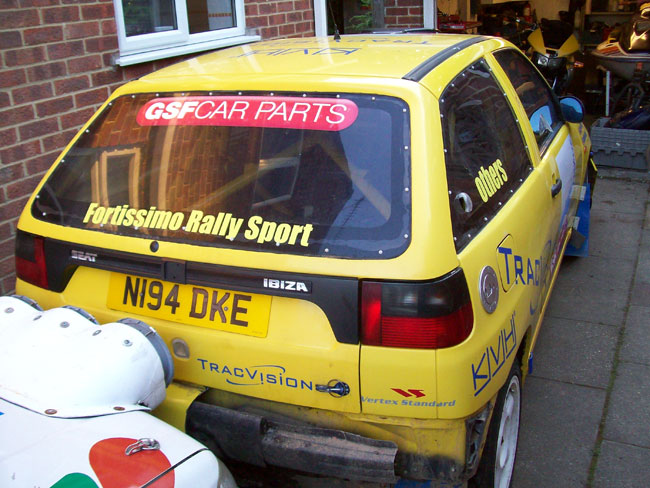
But while I was thinking about this, something popped up on eBay. It was a Seat Ibiza rally car, which looked interesting; fitted with a 2.0 16v engine, with a lot of ‘nice’ bits fitted; a custom cages weld-in rollcage, AP front brakes, Bilstein suspension, a close-ratio gearbox, Quaife diff, quick rack and lots of little details that looked good. It wasn’t too far away (about 70 miles), and worth a trip to take a look – in the advert it looked a bit of a shed, as it had been stood for a while, and had scars from its last outing on the Sunseeker 18 months beforehand, with broken front and rear bumpers. Long story short, I got it for a bit over two grand, but with a huge amount of spares thrown in – enough to completely (and I mean completely) fill Mark’s van when I went to pick it up. It had a few issues (all declared) – head gasket leaking oil, a cracked oil cooler, handbrake seized up and a few other bits and pieces, but it ran well. Here’s what it looked like when I got it home:
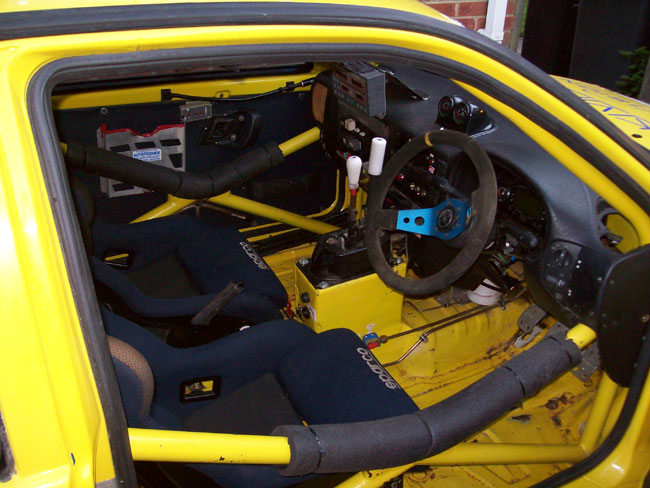
And inside it looked like this
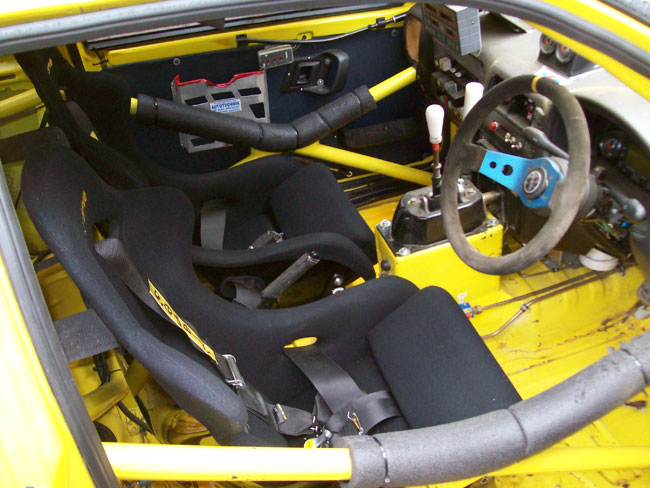
Nicely done inside with a proper upright hydraulic handbrake (retaining the mechanical one for the MOT and scrutineering), raised gear lever tower, Terratrip 404, digital dash (which does datalogging and all sorts), plenty of gauges and so on.
On the downside, the seats were out of date so would need replacing, and there were a couple of holes in the floor that had been drilled to let water out (the car lets water in, alas), and the floor was a bit rusty with surface rust. First thing to take care of was that, so soon after it looked like this:
Next up, the handbrake needed sorting, which was straighforward – the cables were damaged and had rusted, so £20 saw that fixed – fortunately they were standard items and dead easy to change, particularly as the car has the tank in the boot (an ATL bag tank) so the standard tank isn’t in the way. The thing I noticed while doing it was that everything seemed to have been done to a high standard – there were no bodges or anything like that, everything looked really well thought out and engineered.
Obviously the bumpers were a real mess, so they needed to be binned, and fortunately I got a pair from a breaker at a good price, and replaced them and the mudflaps, taking the opportunity to change them to black instead of the original blue, and getting them up to current MSA spec.
The oil cooler was cracked, and luckily £50 saw a Mocal one to replace it directly, much better than saving £10 by buying a cheap one and then spending hours making new mountings and worrying about it falling apart. The front brakes were in a sorry state – one had been replaced by a temporary one of a different size, but spares were included. Unfortunately they had been stored without protection so they had a bit of surface rust on them, so they have been dispatched to be surface machined, and the pads have been replaced. The AP calipers on the car are ENORMOUS – the kit with discs, pads, calipers and mounting bells is around as much as I paid for the car! They should stop the car really well, and it has a bias box which will have a remote adjuster fitted (included in the spares, handily).
The exhaust had a break in it as one of the mountings had ripped a section of pipe out, so this was replaced; typically a perfect-looking bit of welding on something that will never be seen, but hey ho.
Finally (at the moment), the head. The engine has been fitted with ARP studs, but was leaking at the head gasket. The head had been replaced (originally it was fitted with a ported one, but had some problems) with a standard one, so once I’d removed it I took the decision to get a better/ported head fitted. Unfortunately time and so on has got in the way, and it’ll be a couple of weeks until I get the head back from being done; although it’s cost a fair bit more money there’s not much point in not getting the most out of the car from the start, I think. It’s fitted with a set of Kent Cams and was seeing nearly 200bhp, so this should be achievable with that combination, and should make it fun to say the least.
The last thing at the moment is the sills – they had a lot of stone damage, and surface rust as a result of being left for so long; I have stripped and painted one side and have the other to do, but both need tiny repairs at the very rears which should be a morning’s work and no more.
So, as it stands, there’s a few days’ work to go to get it all back together, once the head returns, and then I want to get it MOTed as soon as possible. There’s a possibility I may be doing an event before the Sunseeker as a shakedown as I’d hate to have a small issue cause a problem on it, but whether this happens will all depend on if everything goes to plan. At the weekend I’ll get some decent pictures of the car as it stands, and hopefully get the sills finished off.
Maptastic.
by Darren on Oct.24, 2011, under Build
Now, I’m well aware that last time I posted on here, I said I’d be doing the mapping of the car over the following weekend (i.e. about 10 days ago). I did intend to stick to that, but given that we weren’t entering Rally GB there was no real time pressure on doing it. Saturday’s weather was great, so instead of spending the day playing with the car, I went to Peppa Pig World with Tammie, Mabel and Eddie, and a great time was had.
However, that didn’t leave me with a car that ran well. It now had oil pressure, and sounded OK, but was certainly not in running form, engine-wise, as the change of components (bottom end, particularly the camshaft, and exhaust manifold) meant that the old map would be miles off; it ran well enough to test the oil pressure, but not well enough to be driveable. So the task was to sort that out, and that meant getting all the mapping gear ready. The old laptop I used to use was replaced by a new one which came with “Project X” (to be revealed, soon enough!), a Panasonic Toughbook, which is really heavy and heavy duty. I’d been using it for a while (for no reason, really), and it was fine. But yesterday when I went to start using it, it was as dead as a dodo. No charge in the battery, despite me putting it on the night before. So I spent most of yesterday messing about with computers; unfortunately the DTA software for programming the ECU is complete rubbish – it looks like it was written for Windows 3.0, and is really terrible in terms of user-friendliness. In addition, it’s terribly picky about the serial port it will use to communicate with the ECU, and no USB-Serial adapter I’ve tried with it works (even the one they recommend!), if you’re using a new operating system (i.e. Windows 7, etc). So I was S.O.L. I spent some time researching the laptop issue and finally fixed it with a battery drain utility.
So, this morning I thought I’d try getting it done. First up was to make the car a bit more driveable – it had a couple of flat spots where it just wouldn’t run well at all, and they were dangerous, so first job was to manually patch them up, which involved getting my Mum involved, and she braved the stuttering beast for an hour or so while I got it a bit better behaved (she was noting where the flat spots were, then I pulled over and made changes). Now it was at least capable of pulling away without getting me crashed into, it was time to do some proper mapping. Now, I’ve covered this before, so I won’t go into too much detail, but it involves logging the engine speed, throttle opening and air/fuel mixture, then using some maths to look at the current map that was being used and calculating the new fuel requirements based on what has just been logged. This would be simple if the DTA software was nice and the files it saved were documented, but it’s not, so it takes some jiggery pokery, and this time I finally decided to make a note of what I do so I don’t have to work it out from scratch in the future… (Project X has DTA as well…). There were a few things to sort out to get this all set up (the power extension cable was broken, and I needed to get a new throttle pot), but after lunch I did a few runs, and improved the mix no end – it was running really rich in some places, really lean in others, and once it was more like the required mix then it ran well (when it was running rich it wasn’t happy at all – it felt pretty gutless). It needs plenty of revs to make power, but then I guess that’s to be expected with a works cam – they revved to 8000rpm, after all. And that’s not going to happen with my engine as it has standard rods in there! However, after 5 mapping runs and revised maps it’s running pretty well; not much going on below 3k, but at 4 it takes off and at 6 it really gets going. With the gearbox I have that’s no problem as changing from max revs still drops it back into the power.
Tomorrow I have a few things to sort out, mostly knocks and rattles, but it’s all looking spot on. If only we were doing Rally GB. However, it’s looking good for the Tempest!
Typical!
by Darren on Oct.11, 2011, under Build
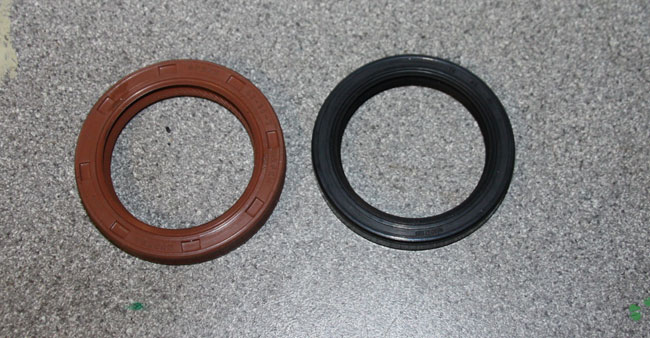
After Sunday’s bad news, I thought it was best to carry on getting the car into a ready-to-rally state; regardless of whether I do WRGB or not, I still need the Skoda up and running. Having ordered the oil seal to fit the new front cover yesterday on eBay, with typical non-Skoda-dealer efficiency they turned up this morning while I was at work. Once I got home, I thought I may as well fit it and see if the new pump and pressure relief valve were really doing the trick as Jim had foreseen, or if there was still a problem. As you can see here, 2mm isn’t much difference, but it’s different enough.
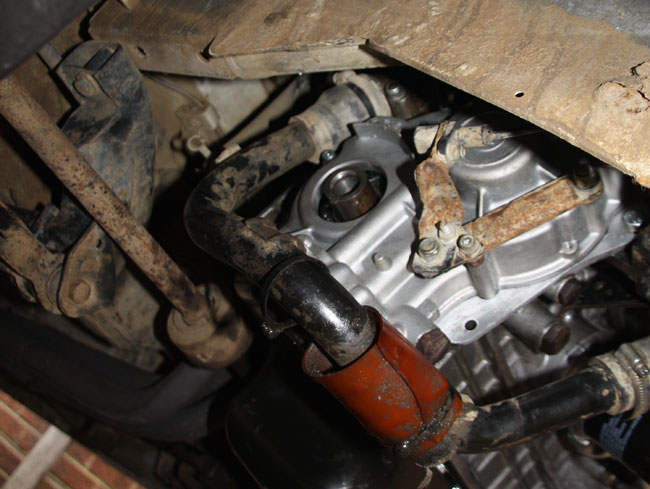
Here’s where the seal needed to fit – in the shiny cover, around the crankshaft.
Fitting oil seals is generally easy enough, and this one was no exception; I had it in place in a couple of minutes, then refitted the crank pulley and bolt, and put the engine back in place by tightening the engine mount bolts. Once the alternator belt was back in place and the engine was refilled with oil, it was pretty much ready to go, aside from one thing. When checking all the bearings it wasn’t possible to oil them on reassembly (as all the oil fell out, believe me, I tried), so I thought it would be best to prime the engine via the oil pump before running it. This meant making up a tool to drive the pump (a long rod with a slotted end and a guide round it to stop it falling off), and then it was a simple case of removing the oil pump drive from the top of the new oil pump cover and driving it with a drill, which worked for about 10 seconds.
I then had a frustrating hour’s wait to charge the battery drill up, and then tried again. And it worked a treat – got oil pressure up on the engine in about 10 seconds, so I put the drive back in, and then it was time to fire up. The engine fired up straight away, so I went for a drive; doing the same drive as I did before when the problem happened, and lo and behold, got home and no oil pressure problems – indeed, even with the car ticking over at 500rpm it was fine, whereas all the engines I’ve had before have flickered on and off at this point. The car is fixed, just needs mapping, which I will be doing on Saturday. Dammit.
That’s it, that’s all.
by Darren on Oct.09, 2011, under Build
Well, after yesterday’s disappointment, another chance to run the car for a weekend and get it mapped was lost before the closing date for Rally GB entries. This delay means that I’m four weekends behind where I wanted to be – mostly delays from Jorily’s incredibly poor handling of my order (taking over a week to give me a price for a part, and then nearly 3 weeks to actually deliver the parts when ordered, despite a two-week period where I was told it had been sent but hadn’t), but also the latest problem with the oil pump/front cover. Having spent some time thinking about it and discussing it with Bryn, we have decided that we will not be entering the event this year. Needless to say I’m gutted having spent a considerable amount of money getting the car ready (over £1000 at last count), and of course Bryn had been preparing too, getting himself a medical so he could upgrade the licence, but with the small amount of time before the closing date that’s it, that’s all.
I’m still going to get the car ready, having already ordered the last (£3!) part needed to finish it off, so if the oil pressure issues are sorted then I’ll get the fuelling mapped up next weekend, and take it from there. I may enter the Tempest Rally as I’d like to make some use of the car again this year, and the entry closes half way through half term, so I could competitively use the car before Rally GB. Other than that, I’m not sure what the future holds – the car is eligible to do Rally GB 2012, and if all goes well will be completed with about 10 months to spare (as it runs in September 2012); the Sunseeker will be done in a different car, in case anyone is wondering, and there will be more to come on that front in the coming weeks.
The path of my life…
by Darren on Oct.08, 2011, under Build
… is strewn with pats from the Devil’s own satanic herd, to quote Edmund Blackadder.
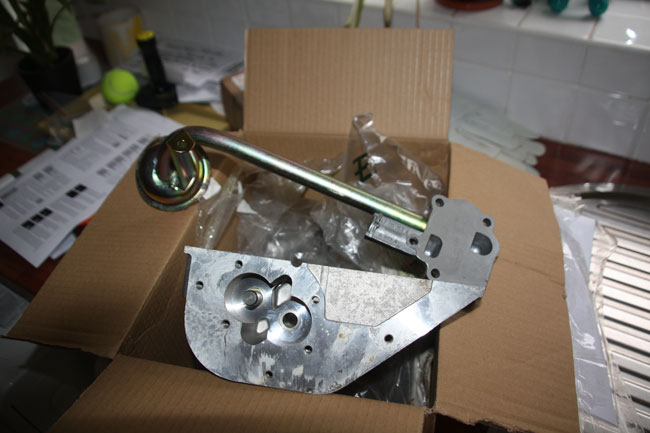
Yesterday, the new oil pump and pickup pipe that I ordered were due to turn up. However, the supplier didn’t get them in time, but after a phone call to them to ensure they knew how important these parts were and that they had to be with me today, they were sent special delivery, turning up at 8:30am this morning. Opened the box, and this is what I saw:
At the top, the oil pickup pipe. At the bottom, the engine front cover, which houses the oil pump (the two round sections where the gears go). The old pickup pipe’s pressure relief valve wouldn’t even hold me blowing on it, while the new one certainly does, so it seals 100% and that’s what I was hoping – it came with spring and bearing fitted, thankfully. Splendid, it was time to get started. I got out in the drive, got the sump off (placed back temporarily after stripping the engine the other day), and then set about removing the front cover from the engine. This is fairly simple, but means dropping the engine down to get the crank pulley off. Thankfully Skoda have thought about this and the engine mounting bolts are long enough to just loosen off and drop the engine the required 20mm or so. It all came apart easily enough – good music on the radio, everything going as planned. Finally looking like a great day for the Skoda. Here you can see the difference between the new (left) and old (right) pumps – the body is quite scratched, which will have an effect on pump pressure, plus the new one has much lower clearance whereas the old one was nearer the wear limit.
Where the crank comes out of the front cover there is an oil seal, which I have a couple of spares for, so I went to fit it and hit a problem. The hole for it to go into was too small. I couldn’t believe it, so I checked the seal I had against the cover that had just come off – it was the same size, 58mm outer diameter. There had to be some mistake, so I measured the hole.
Oh. Well, needless to say I thought more than just “Oh”. After I’d regained some form of composure I took a look at the old bottom end. 58mm. The other spares I have, 58mm. Clearly I’d made a mistake, so I checked the online parts catalogue from the page I had ordered it from, and checked the seal size quoted there. And it was 58mm. Not the 56mm of the casing I had. After some checking online, I discovered the problem. The part I have been sent is not the part I ordered. It was one from an earlier car, a RWD Skoda, and although the engine is the same, there are clearly some detailed differences and this is one of them; the earlier engine’s oil seal has a 56mm outside diameter. I think what’s happened is that the part is old stock, someone has found it without a part number and mis-identified it from a catalogue. Needless to say I will be letting said supplier know of my displeasure. I phoned several Skoda garages in reach, none of them had either a parts department that was open, or the part in stock. No bearing factors are open locally on Saturday, so there’s no option to get the oil seal.
Bugger.
So there’s no way the car can run this weekend. I can get the right seal easily enough either online or locally by Tuesday, but that’s too late. However, I decided to use the time I have to get everything back together as it’s possible to fit the seal in situ, so I spent the next hour or so putting everything back together – the new cover went on easily enough although my brackets for the crank sensor needed a small mod to the spacers (OK, washers!), and everything else fitted as it should do – pickup pipe and sump going back on without any issues.
The car can’t be run until Tuesday at the earliest (I work until 8pm or so on Mondays so nothing will be done then, alas), so I guess I’ll have to see what’s going to happen; I’m still not 100% sure I’m not at home to Mr Cockup, despite having found the problems which Jim had predicted, so I think a decision will need to be made soon about Rally GB. Stay tuned, and keep your fingers and any other appendages crossed.
The investigation begins…
by Darren on Oct.06, 2011, under Build
So, last time out, I had an engine that ran well, but didn’t have much in the way of oil pressure, particularly when hot. Not great, and clearly needing sorting out. I’d asked about and had some info from Jim Jones (who knows pretty much everything about Skodas) who said he suspected the pressure relief valve or the way the pickup was seated on the oil pump body. After finishing work today I thought I’d make a start on checking out what was going on. First up, the sump needed to come off; as it had only been on there for half an hour of running or so it came off without issue once the oil had been drained, revealing the bottom end in all its glory. I thought it was best to check all the bearings, and this can be done with Platigauge which allows you to accurately measure the bearing clearance – it’s like a thin strip of plasticine which you put in the bearing shell, bolt it up tight and then undo it, and measure how wide it has spread against a measuring sheet to see what the clearance was. The Skoda engine has 7 bearings in total – 3 main bearings and 4 big ends, and all the mains checked out OK, and big ends 1,2 and 3 did too, but No. 4 looked to have got a bit hot – it wasn’t terrible, but the bearing looked pretty worn. The crank looked fine, and amazingly (again!) I had 2 suitably-sized big end bearings in my box of bearings (from previous engines), and they fitted perfectly. Phew.
So, it looks as if the crank bearings are all fine, so why the low pressure? Well, now I seem to have removed the need to take the engine out, it was time to look at the pressure relief valve. This is part of the pickup on the 136 engine, and consists of a ball bearing and a spring – the bearing seals a port in the oil pump, and once the pressure gets too much then the spring lets the excess pressure out. If this valve leaks, then the engine will not have good pressure at idle, as that low down it needs as much pressure as it can get and can’t afford to leak any. So, I took it apart, and it looks as if the sealing area where the ball seats is rough – indeed it wouldn’t hold my breath when I tried to blow through it, even with the spring pressing hard against it, so hardly likely to resist much in the way of oil flow, I’d hope.
Either way, I have a new pickup and oil pump body arriving tomorrow, so hopefully when I put the spring and ball bearing into that, it will stop the flow, and in that case, it may well do the trick. Here’s hoping…
A long weekend…
by Darren on Oct.04, 2011, under Build
… starts on a Friday afternoon. After the previous day’s debacle, I had arranged for the engine to be taken back and a full refund. But this of course meant I needed to build the other one, and the parts had arrived. The first task is to change the main bearings, which was done in short order as the whole engine was in bits. Oiled up and with the crank in place it turned over easily, which seemed a good sign, so I then got on with the least favourite bit, getting the liners in; they are free in the Skoda block, and they need to be shimmed to the correct height above the deck and also relative to each other. This is a slightly tedious process and it took an hour or so to get them in correctly. Next would be fitting the pistons to the conrods, which should be straightforward, but I wanted to check the pistons were OK, and found… a problem.
The piston/liner set I’d been supplied with had been made up from a set of liners with different pistons as my engine is a 136 (high compression), and the set the supplier had got was a 135 (low compression) set. And checking the pistons showed that they weren’t all the same size. Normally, this would have been a case of the fat lady singing on the engine, but as luck would have it, I had a single spare one I’d bought years ago and stored, and it was the right size! How convenient. So with that luck out of the way, the rest of the engine was built up – conrods on pistons, rings on conrods, pistons into bores (carefully to avoid any issues like before), and then finally conrods onto the crank. Within an hour or so, I had a working bottom end. Camshaft was now fitted and it was time to check the timing – manufacturing tolerances can mean all sorts of issues with cam timing, and this is a crucial setting that determines the engine’s performance and character. Mine needed to be with the inlet valve reaching maximum opening at 108 degrees, and I was finding it difficult to measure accurately with the head off, taking the measurement just from the cam, so i needed to fit the head and then take it from there.
Unfortunately, an error occurred here which cost me a lot of time – I have a ‘degree wheel’ fitted to the crank, and I managed to disturb it by turning the engine the wrong way and loosening the nut that held it. This happened after I’d fitted the head gasket, so I needed to measure it accurately again which meant I had to make up a special tool to allow this, and then re-set the wheel accurately. Another two hours gone, but thankfully the cam was timed up perfectly. Last time I needed to make up an offset key, and that took me a couple more hours to get right.
So, I finished building the engine, fitting the oil pump, sump and other covers, and got it bolted to the gearbox in time for lunch. Splendid, I was back on course.
After lunch, I fitted the engine to the car (with mum’s help as ever), and the properly-jointed exhaust manifold made fitting much easier as I could take it off, fit the engine/box and then fit it afterwards, rather than try to get it on and then lift the engine into place. Everything else went pretty smoothly, and 2 hours after stepping out the whole lot was back in the car and ready to run.
But would it run?
In short, YES! It fired up near-instantly, and this was despite me accidentally leaving one of the injector plugs off so it ran on 3 cylinders briefly. With that fixed, it fired up without hesitation, and I revved it up a few times and held it at various RPM as people suggest with a new engine. All seemed OK aside from the paint on the new manifold burning off (it looked like the car was on fire at one point!). A few more checks and changes and it was back on its wheels and ready to drive, but I called time as I was pretty tired.
Sunday saw me drive the car for the first time, and it moved without issue; I could instantly feel (and hear!) the diff working when I moved it, and with everything double-checked I went for a first drive. Several things were noted; firstly the car ran pretty well considering it was mapped for the old camshaft, not the new works one that’s fitted now. Secondly, there was still a lot of smoke (which turned out to be because the dipstick was the one thing I’d forgotten so it sprayed oil directly onto the exhaust – no big deal once I’d fixed it). But thirdly, I had a problem. There was no oil pressure at tickover once the car was hot. This had been a problem before with a couple of other engines, and given the new bearings and so on I wasn’t expecting it. However, I thought it may be that the oil was getting hot, so I fitted an oil cooler (which I handily had, I’d never fitted it), but alas this didn’t make too much difference (although it won’t hurt when in competition, I’m sure).
I have done some asking on the rally forum and the general consensus is that thicker oil (such as 10W60) will sort it, and also that I should take a look at some of the oil pump mechanism where the oil gets sucked in and the pressure relief valve. I’m erring on the side of caution and have ordered a new oil pump body (the front cover of the engine makes this part up) and a new oil strainer/sucker to hopefully eradicate this permanently with all three. If not then there’s clearly a problem with the crank bearing clearances, and if that’s the case then I will have to get a regrind done; I have a spare crank which can be ground down to the current size I am at with this engine, so I am not despairing (yet!), but it’s not ideal as it will mean engine out to get the crank out, so another weekend’s work in total to do that. I really hope it doesn’t come to that…
