Author Archive
Looking up?
by Darren on Feb.16, 2010, under Build
Every car needs an MOT. Even a rally car. Even if you are only using it on “single venue” events which are off the road, it’s usually a requirement for the car to have an MOT, and of course the kind of rallies that I do involve forests and driving inbetween them, which means driving on the roads, and a fully road-legal car. And therefore an MOT.
Every year I plan to get the MOT done in the Summer, so I’ll have lots of time to work on the car, and nice(ish) weather to do it in. And almost invariably, this fails completely. Fortunately last Friday wasn’t too bad, and the car seemed mostly OK – I’d checked all the things that I thought could be a problem, and hoped all would be well.
And thankfully it was – the mapping worked well for the emissions test leading to a nice clean exhaust and a test pass, and the car was good in every other respect; having a rare opportunity to inspect the underside while stood up showed that for the most part the car was looking OK for one that had done a bit of forest work; there are a good few dents in the floor but nothing terrible, and no nasty surprises. The drive to and from the MOT station gave a chance to take in some different road conditions (given that it was a Friday rush hour), so those logged miles will help the map out, and this time it showed a much wider range of engine speed and load was being used. Still more to do, but getting there; the car was getting far more driveable now, and the last piece of paperwork for the car was complete.
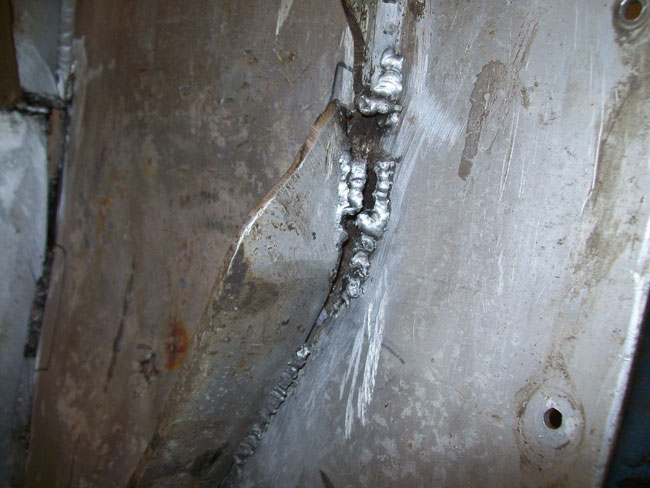
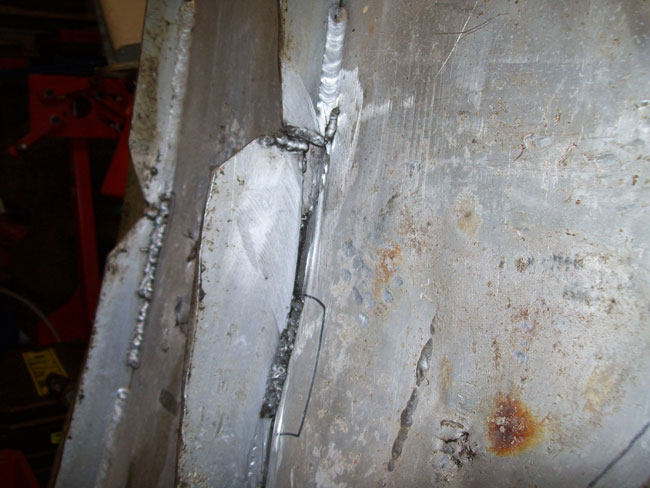
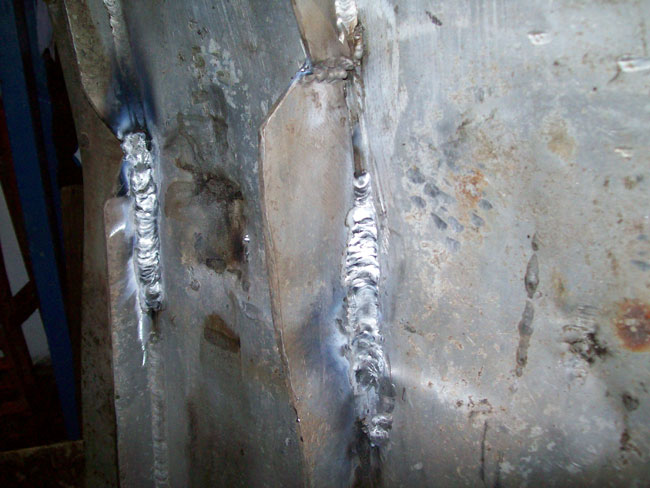
However, there is still a major part of the rally equipment in need of a fix, and that’s the sumpguard. On the Skoda the engine and box sit quite low compared to many other cars, and as a result the sumpguard is more complex than many (some are just a flat sheet) and also gets a right bashing as a result! The sumpguard on R477KRU was already secondhand when it was built (having come from “the idiot”), but after 1.6 Rally GBs and a Sunseeker, it was looking very sorry for itself, having cracks in the strengthening bars, and the runners beneath having cracked off:
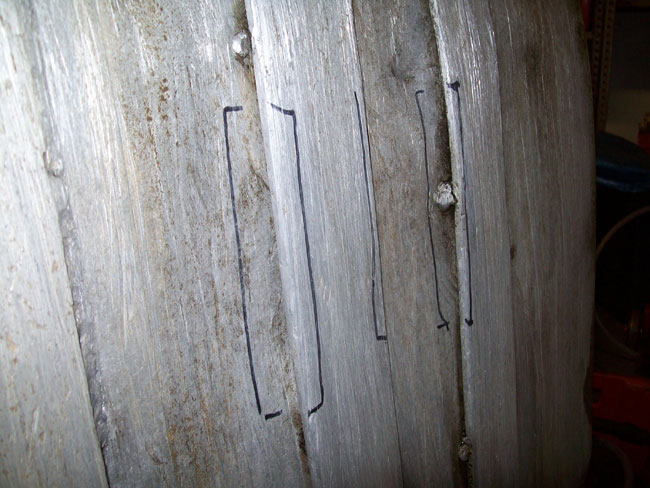
As you can imagine, this was better than no sumpguard at all, but not as good as it should be. So after spending an hour cleaning it off (given that it was covered in gearbox oil and sand, which came out from every crack), I took it to the fabrication place up the road, where a rather unhappy-looking chap quoted me £50 to weld it up, having done the usual sucking in of air through-the-teeth about how crap the sumpguard was, etc., etc.
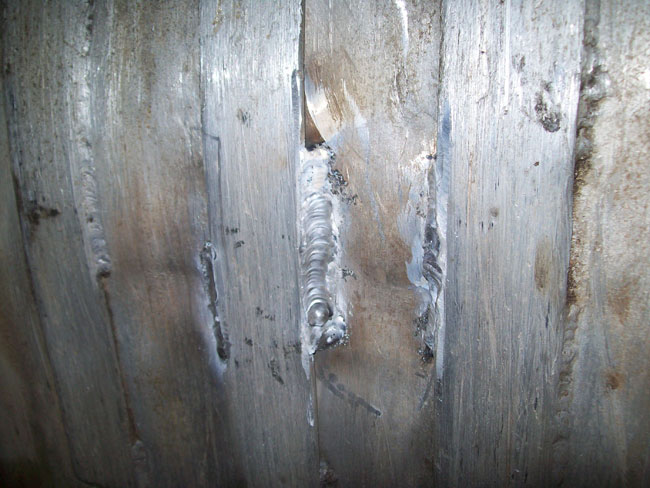
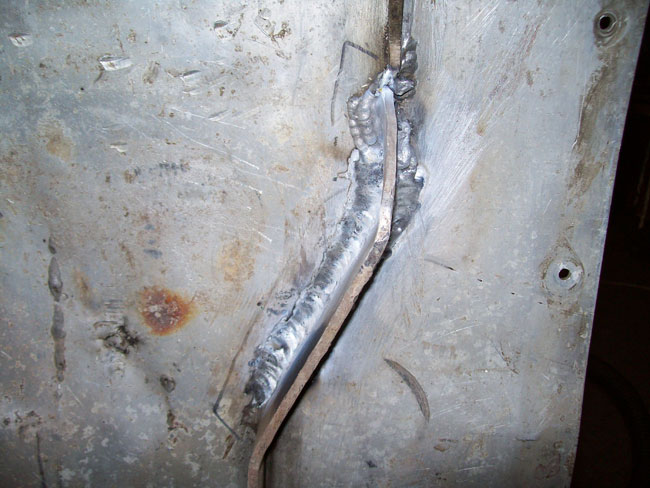
Amazingly, today (the next day!), he phoned to say it was all done. And I went to collect it, to find this:
OK, it’s no oil painting, but it’s a LOT stronger than it was before, so hopefully that will be up to making it through Wareham Forest, amongst other places….
Bright sparks
by Darren on Feb.09, 2010, under Build
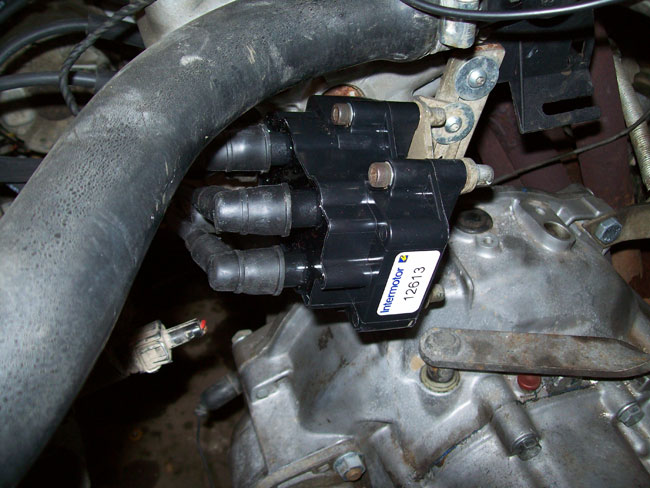
So, last time out things were looking up, but it was time for a change of coilpack and plug leads. Which should be straightforward, just go and buy one. Simple enough. Except, of course, you guessed it; not as simple as that. Finding the coil pack was easy. Not down to any great skill on my part, more to it having a part number. A nice surprise was that buying it from my local car shop – Motorists’ Discount Centres – where I get all my “everyday” car bits was actually cheaper than anywhere I found on the Internet (although I’d rather get bits from them anyway) at £55 – less than the £80 or so I’d been quoted elsewhere.
So, that was half the battle. The other half wasn’t so easy. Back in the day, you’d just go into any car shop and pick up the leads you needed; they had different lengths on the shelf. Nowadays, that’s not the case; everything comes in sets. And I didn’t know what would fit. Thankfully another larger local store, SMC, was worth a trip; £9.31 later, I had the leads I needed.
Put them all together, and then on the car….
Far too shiny! However, the car fired up much more easily than before, so hopefully this will have the misfire sorted out; it was present with the old engine at rallyday as well, so I’m hoping that will be it… I won’t have a chance to drive the car until Thursday, so I guess I’ll know then.
Mapping once more…
by Darren on Feb.07, 2010, under Build
At the end of this week is one of the things I hate about cars. It’s MOT time. And obviously amongst the many other things that are tested, the car’s emissions are scrutinised. Which means that it needs to run properly and use the right amount of fuel to give a nice clean exhaust. Or something like that. Anyway, while the car fired up last weekend, there is a lot more to it than that; the right amount of fuel is needed for the car to not only pass an MOT but also to make decent power, to protect the engine’s internals (too little fuel and it will run too hot, possibly melting a piston; too much and the oil will be washed off the bores leading to engine wear), and to make the car driveable.
So, with that in mind, all the mapping gear was connected up; there’s a sensor which is in the exhaust which measures the air/fuel ratio, and in addition there is another box which measures the engine speed and the throttle opening. It also measures G force forwards and backwards and side-to-side, but that’s just an amusement for me rather than anything I make use of. All of this data gets recorded as I drive the car, and then can be downloaded to the laptop to set the map up – this needs to be done several times due to the changing conditions and that things don’t react quite as you’d think; the more you learn about how engines work the more you realise they are really, really complicated things and there is a great deal happening all at once.
But that’s by the by; I didn’t get to do any driving yesterday as I’d made myself ready to do it and… the recce car battery was flat! So that meant a few hours on charge as pushing it out of the way is definitely not an option at the moment. But once all was well this morning, I fired up the Felicia and took to the road. Well, I say that, it was more a case of car spluttering into life against its wishes, and then me having to cajole it into even moving a foot. Looking at the meter, the mixture was massively lean, so there was next to no power. I reversed out of the drive (with one of my neighbours giving me that look) and then got the car going forwards, and started recording.
And then for some reason I lost my mind.
I live on a road which is alongside a dual carriageway. And for some unknown reason instead of sticking on my road, I went onto the dual carriageway, and as soon as I did, the car died.
Completely. I was 20 yards onto the road, and no way back. After what seemed like an eternity, I got it to fire up but it didn’t want to move, and despite me having put my hazard warning lights on, people clearly weren’t paying much attention; getting rear ended wasn’t on the menu but was looking likely, but I managed to get enough fuel in to at least move the car; this involved pushing the accelerator repeatedly (which injects more fuel momentarily) which at least did enough to get the car moving, and then round the roundabout at the bottom and the same going up the road; here was where the close ratio box really paid off as I could at least do a semi-sane speed and as it was a Sunday morning the traffic wasn’t bad, so I got round the roundabout at the top and back home without too many problems.
So, stop the recording, and then time to re-do the map. Which I’d thought was straightforward, but when I went to do it I realised that I’d completely forgotten all the tricks I was using to make the process quick. Rather than entering the values into the logging software, doing the calculations and then manually re-entering the new values, I had come up with a system which used a spreadsheet to keep the values in, and using Notepad++ to edit the output from the logging software to be changed into the DTA Map format.
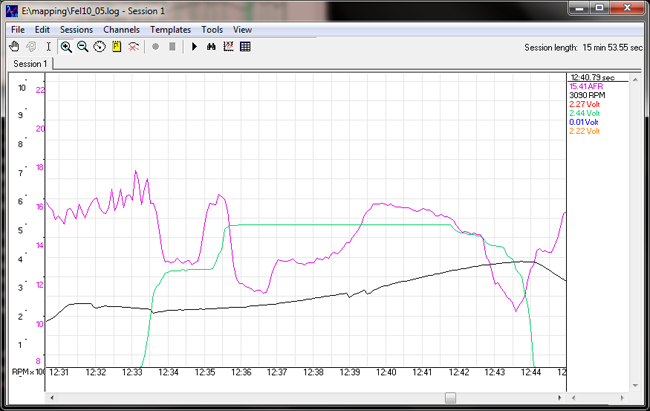
Thing is I had no idea what I’d been doing, and I’d not made any notes. So I spent nearly an hour reinventing the wheel before being able to do what I’d been doing simply, and then saw that the engine was taking in a LOT more air than the last one; this is a GOOD thing as it’s more efficient and should mean more power in the future. But the idea now was to make it driveable – after all, it had been almost unable to move itself. And the log made why quite clear:
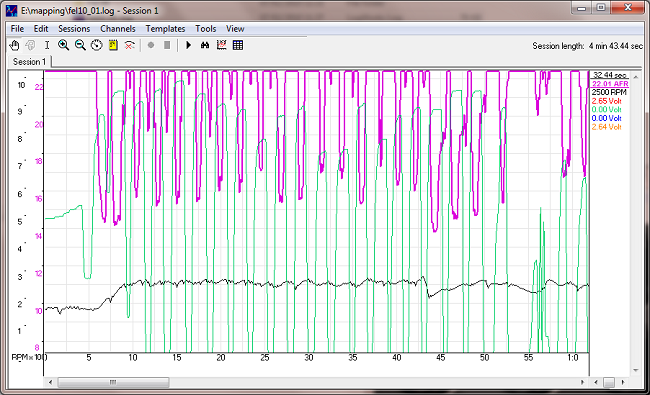
The pink line is the mixture, and ideally it would be around the middle of the graph (top to bottom). The black line is the rpm of the engine, and the other line shows me repeatedly hammering the throttle as it was the only way to get enough fuel into the engine at all. Not good! Even the first mapping change altered the way the car behaved completely – it was much. much better already. This meant that firstly I could venture out on to the main road without risking death, and secondly that I could then use a wider range of throttle openings and engine speeds. After another short drive, more changes, and then a longer drive, this time about 15 minutes, with the car behaving much better, aside from an occasional misfire.
Back onto the PC, more changes made (this time over most of the used rev range and throttle openings, as I’d been careful to use as many combinations as I could do), and a more drivable car again; another longer trip was much better, except again there was a low-speed misfire. This was not down to mixture as I could provoke it at will and looking at the meter (and indeed looking at the log afterwards) showed that the mixture was spot on, so I suspect that either the coil pack or the spark plug leads are on the way out; above 2500rpm the car was running cleanly and smoothly, and feeling really good.
By way of comparison to the log shown above, here’s one of the later ones, and you can see that the mixture is much closer to where it should be (around the middle, but that’s dependent on speed and throttle to a degree), and no longer is the throttle being pressed maniacally.
So, it’s time for a new coilpack and plug leads; this is one of the original parts that I got from “the idiot”, and as all the other parts from “the idiot” have been sub-standard, it’s something I’d rather eradicate before looking any further. And once I’d removed the coil pack, I saw that it was dated 2001, so it’s probably time for a replacement; I doubt he fitted it new!
Time to check other things for the MOT, so I checked the lights and so on, all was well, and then cleaned the poor thing inside, and tested the new Peltor intercom with the extension leads for the first time. OK, it was wallet-meltingly expensive, but it really is fantastic; I could hear everything said with perfect clarity.
And that’s how it stands. The MOT is on Friday afternoon, but I have a busy week until then, so I may get a chance to drive the car with the new coilpack before Friday afternoon, hopefully that will clear the problem along with some nice new plug leads, and maybe even a set of plugs – the boat is well and truly pushed out.
As an aside, when I was driving the car on the last mapping run, I drove past Canford Arena, which is the service area of the Sunseeker. And said to myself that it just might happen. I’ve made great strides forward with my back this weekend, having had a couple of terrible days this week, so hopefully they were a glitch rather than a trend. Here’s hoping.
And a little bit more.
by Darren on Jan.31, 2010, under Build
Today it was cold again, so I didn’t get started until the afternoon, but there were only a few little things to do (which is a good sign), as the next step will be getting some of the mapping done to get the MOT out of the way. Mostly it was a case of little bits and pieces, like fitting the fuel line mountings properly, making up a new blanking plate for where they leave the car and go to the fuel tank and also fitting the Peltor intercom cabling properly. I had wanted to use velcro to fix the intercom in place, but it wouldn’t stick to the base of the Peltor as it has a foam rubber strip on the bottom and I didn’t want to rip that of, so I had to drill two holes in the dash to mount it. I’m not sure why, but I don’t like drilling holes, even though it’s a rally car and hopefully I’ll never remove the intercom. On the plus side, it’s properly secure and in a place where both of us will be able to adjust the controls while seated. Fire extinguisher back in (and miraculously the external pull works perfectly), tidy up, etc. So, next I need to get the old beast insured, and then next weekend I can get it ready for the MOT, planned for the end of the week after next. Then it should just be a case of a mapping session, getting the sumpguard welded up, and fitting something which will be a nice upgrade for the car…but that’s for another post.
Where there’s life…
by Darren on Jan.30, 2010, under Build
… there’s hope. So for any hope, it was time to see if the new engine would run. Most of the work had been done last weekend, but there were still a few things left before I could even turn it over, and to get started it was time to take the cover off the car. As you may know, I don’t have a garage big enough to work on the car, so it’s out in the drive. And it was cold last night. Cold enough that even though I’d left it til nearly midday, getting the cover off the car wasn’t easy as it was iced onto it! Not a good start, and getting anything done then involved picking up tools which were of course bloody cold as well. Unpleasant, but necessary.
I connected everything up, making up the new fuel hoses as needed, and double-checking everything. Then it was time for the radiator, which meant changing the water pipe (there are two types on the Felicia, and this was, predictably, the wrong one). The other one I had had a weird bracket on it which made it impossible to fit onto the car, so it was time to cut that off. I did it with the hacksaw to make sure I didn’t cut anything important, but I then wanted to tidy it up, easiest done with the angle grinder. Which didn’t seem too happy and was turning rather slowly. I touched the grinding wheel onto the part, and suddenly the grinder REALLY wasn’t happy. There was smoke, and I ended up having flames coming out of it – I’m no expert, but I think this means the grinder is broken. I walked out of the garage holding the now-dead grinder by the cable, looking like Dr. Venkman with the full trap in Ghostbusters.
The rest of fitting everything went smoothly enough, it’s just plugging bits in. Putting oil into the engine reminded me how cold it was – it was pouring like treacle. And then, the big moment. Would it even get oil pressure, let alone run? I disconnected the ECU so I could just turn the engine over to get oil pressure, and it did so fairly quickly. Result. Now I plugged the ECU back in, and turning over saw no activity at all anywhere, and this was quickly traced to the crank sensor needing adjusting. Once that was done, it made encouraging noises, and fairly quickly, it fired up! Result #2. I checked everything over for obvious bad signs (leaking oil or water, etc), and all was well. So I fired it up again, and kept it running to warm it up a bit. The wideband O2 meter was showing that the mixture was a bit rich, but you’d expect that during warm-up, and indeed the idle mixture ended up being really lean (I can’t remember what it was set at before, it was that long ago), and it sounded a bit lumpy as a result. But with a bit of adjustment it was ticking over, so I let it warm up and then was very good and cautious and changed the oil. This engine had been left standing for a while so I wanted to make sure any dust/crap/junk/insects that were inside would get washed out, and that it had nice new oil for its new life. Easily done, along with a bunch of other little things that were needed, and I decided to do a compression test which showed all cylinders at good pressure and nice and even, and then finally it was time to see if I can get in the car.
This might sound silly, but getting in or out of a car is something that’s generally painful for me at the moment, and doing so with an X door bar in the way, even more so. Amazingly it was easy enough to get in, and I went to fire it up and nothing! Reason being I’d disconnected the starter to use a remote for the compression test, which meant I had to get out of the car sooner than I’d though, another thing I wasn’t looking forward to, but it was OK. Second time, it was easy, and a chance to spin the wheels up in each gear to check the gears were all OK, and the box was happy. And it was. Five speeds plus reverse. Brakes seemed OK and the engine pulled against the brakes OK as well. Overall, a good day’s effort. I’ve written a list of things to do tomorrow, but until the car is insured I can’t do anything about either getting an MOT or getting it mapped, so I’ll have to take it a step at a time. And decide what’s happening about the Sunseeker, which is four weeks today.
…and another
by Darren on Jan.24, 2010, under Build
OK, the engine’s in, but there’s plenty more to do. The first is something that has needed doing since the last time the car moved, and that’s replacement of the fuel lines. They were new when the car was built in 2007, but they had degraded somewhat, and the fuel tank end had started leaking – hardly a good show. So after looking at various other solutions I have decided to replace them with solid fuel lines instead of the braided hoses, with short (easily changed) lengths of braided hose at the engine bay and fuel tank ends for the connections to the standard fuel rail and pump. The other option of replacing the whole lot with high-quality braided hose wasn’t an option as the PTFE liner wouldn’t work reliably with push-on (jubilee-clipped) fittings.
So, the first thing was ripping the old lines out, easy enough as I bolted them in place, and they run inside the car (for obvious reasons on a rally car). But getting the new ones in….well, let’s just say there are some times that you do a job and then remember what a huge pain in the backside it was when you originally did it. Trying to make a neat job of getting an inflexible pipe into the car is bad enough, but then getting it so that the end where the fuel tank is is in a good place to connect the hoses where there’s minimal room and very little access was best done with lunch in between one pipe and the second. It’s not the neatest job on earth, but it is very solid, and the pipes will run to 120bar safely, 40x the fuel pump pressure. So that’ll do. Biggest bonus? The braided pipes ‘sweat’ fuel, and the solid ones don’t, so there will no longer be the smell of petrol inside the car.
Then there were lots of things to reconnect. And a decision to make about the inlet manifold. Given that we will be doing Rally GB this year if I have anything whatsoever to do with it, and with that in mind, using the GpA-legal manifold is the way to go. So with that in mind, the exhaust got bolted into place, and then the inlet manifold as well. Which took an age as the studs needed either removing (in the case of 2), or the threads needed a die running down them, which involves removing the stud and then doing that on the bench, and putting it back. Which takes a lot longer than just “put on manifold, do up bolts”. And then the two studs that came out… had to go back in to hold the thermostat housing! Then connecting various things up, putting the starter motor on, fitting the crank sensor and making a list of broken things to replace – all minor, but all of them need to be done. And that was that, Sunday done; while it seems that the epidural may be finally having some positive effect, I’m certainly not out of the woods, and my body was saying it was time to stop. So I did. No more progress until Saturday, alas, as I have a full week of work, but it’s going in the right direction. Slowly, but the right way.
A single step…
by Darren on Jan.23, 2010, under Build
There’s an old proverb about the longest journeys being started with a single step. And at the moment, getting to do anything again seems like a very long way away, let alone getting the car done and ready for the Sunseeker, and getting me ready for the same. But today a first step has been taken. Kev came over around lunchtime to get the engine into the car. First up a precautionary clutch change was done (revealing a lightened flywheel into the bargain), and then the front pulley needed to be changed for one with a toothed wheel welded to it, to allow the DTA management to run off it. I took the one off the engine that had just come out and…. it’s the wrong size! there are two sizes of crankshaft nose on the 136 engine, and this was the wrong one. Fortunately, many moons ago, I didn’t know this and I’d had a different one made up which handily was the WRONG size until today. So that error 18 months ago made things a piece of cake today.
Taking the engine out of the crate took a bit of effort as Ady had made a very sturdy job of the crate and the mountings, but once it was out, it was fairly simple to get the gearbox onto the engine (I say simple, it was for me as I was just rocking the crank back and forth, while Kev did all the hard work), and once it was bolted up, it was time to put it in. We even managed to get it under the car on the “giant skateboard” I made years ago for such jobs, and getting it into place was really simple; obviously I’ve done this a few times and with a strong helper it’s a piece of cake. The only trick is getting the exhaust to engage on the way up, but this was done and the engine was bolted in quickly enough. Kev even put the gear linkage back on, and next it was time for the driveshafts.
Previously these have been tough because of the lack of the chamfer on the Gripper LSD, but greasing the circlips to keep them central (something I came up with after an hour of struggling before) had them in easily – long shaft at first attempt, short one at the second. Hubs all bolted up, and that’s a good effort for today; I was supposed to be going to France for a snowboarding holiday this week, but that obviously hasn’t happened, so Paul is off there at the moment. Kev needed to go as he, too, is off on a similar holiday tomorrow morning, so it was grand that he’d helped (OK, done!) all the heavy work needed to get the engine back in place. Everything else is easy to do in a piecemeal fashion, and the most awkward job will be changing the fuel lines throughout the car due to the old ones failing.
There is a choice now – either try to get the Weber Alpha inlet setup sorted out, which will involve getting new parts and probably making up an airbox; this would be legal for the Sunseeker, but not for Rally GB, but give a LOT more power. The MPi inlet setup is obviously legal for both, but won’t be as quick. Either way, the engine will need to be mapped, which will take some time and cost money as well, so I have to weigh all these things up. But that’s in the distant future (in terms of effort), although obviously not far away now as there isn’t much time left if I am going to enter the Sunseeker. I’ll have to sleep on it.
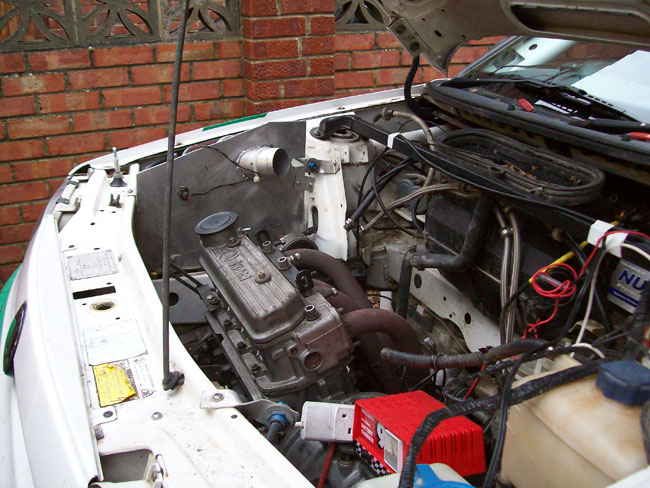
Engine - in place!
What’s in the box?
by Darren on Jan.21, 2010, under Build
Today, while I was at work, a box was delivered.

What's in the box?
But what could be in such a large, heavy box?

Oh, it's an engine!
Yes, of course. It’s an engine. Let’s just say that time is a little shorter than I’d like. In fact, obviously, a lot shorter than I’d like. Particularly given the medical issues, and the fact that the epidural I had on Wednesday doesn’t seem to have done much other than cost me a day’s wages. However, that aside, getting another engine rather than messing about for ages with the other one seemed the expedient thing to do, and one turned up; hopefully it’ll turn out to be a good’un, only time will tell!
Problem is that it needs to go into the car. The jury’s out on when this will happen, due to various issues, so it could be that it will be too little, too late as aside from just putting the engine in, it would also need to be mapped, a few other things done on the car, and then getting it MOTd. And time is very short. So, we’ll see, but I’m guessing this could be yet another thing that I’ll be missing out on.
Work begins again…
by Darren on Jan.16, 2010, under Build
Those of you who know me (and indeed those who have read this blog for a while) will know that I’ve suffered with a dodgy back for years (about 20 years), since someone nearly broke my back in a fight. Well, I say ‘fight’, he attacked me from behind (coward), and since then I’ve suffered nearly annually with back problems, despite having spent a lot of time doing exercises that I’ve been told to and so on. However, this time has been different. Usually after a couple of weeks of intense pain, and about 6 weeks overall, I’m back to normal. However, 4 weeks in (this started in early October) I started to feel numb feet, and it turns out that this is a sign of a ‘slipped’ disc. Not good. And usually takes about 6-8 weeks before it heals. However, as you can probably imagine, that hasn’t been how it’s gone. The back pain has been constant every day, and the numbness has developed into pain. Long story short, I’ve had an MRI scan, which has shown this:
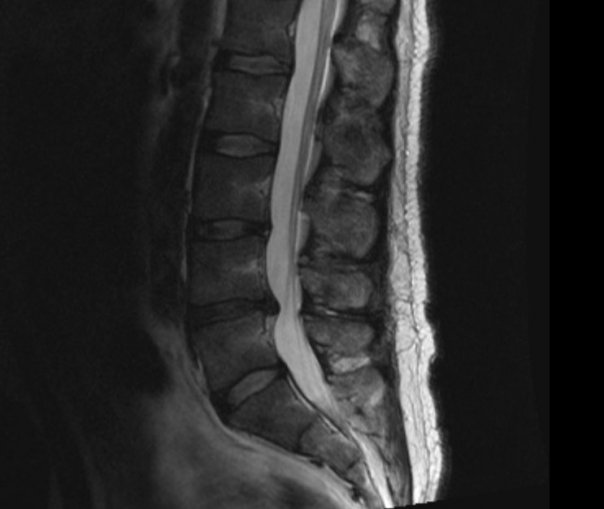
My dodgy back.
The light grey line down the middle is my spinal cord, and you can see that near the bottom there’s a black bit sticking into it; that’s my disc, and the squeezing is why my feet feel funny and it hurts there. I don’t want this to turn into some long medical thing, just an explanation of the lack of progress or activity recently. I’m having an injection into it on Wednesday which should help, but the outcome is uncertain. I’ve not been able to do much of anything since October 4th, which is getting very tedious, and I can’t sit down for any length of time. Driving is the worst activity of all, so if the injection doesn’t help, I won’t be driving anyway.
But there has been progress! A desperate plea on Facebook saw a reply from Kev Jackson, who has been round this morning with his friend Cassie and between them (with a bit of direction from me), the engine and gearbox are OUT of the car – more progress than has happened in 4 months. I have bought a replacement engine for the car, and it’s being delivered some time this week, so with any luck in a couple of weeks’ time the car will have a new engine in place in it, and hopefully it’ll be done in time for the Sunseeker, and I will also be in a position to drive the damn thing.
It’s all very up in the air, and it seems a very remote possibility, but if there’s any way it’s humanly possible, I will be doing it in the Skoda; this episode has already been a bit of a nightmare meaning a withdrawn entry on the Exeter Trial (which eventually was cancelled anyway because of the snow), a miserable time at Christmas (as I can either lie down or stand up, nothing else really), and also missing out on a snowboarding holiday. Hopefully the Sunseeker won’t be added to the list.
Christmas is here….
by Darren on Dec.26, 2009, under Build
…. and unlike normal people I ask for money to go towards something for the rally car. As you may know, for any International-status events from the beginning of 2009, it became compulsory to use a HANS device; if you’ve seen Formula 1 in the last few years you’ll have seen the drivers with these on, a thing that sits on their shoulders and stops the helmet and head from over-flexing the neck and damaging the skull in the case of a head-on accident. An admirable safety device, but there are a couple of problems.
Firstly, the cost. The original carbon fibre device is about £800. The “cheap” device is still nearly £500, despite being injection moulded; due to the way the FIA works, there is no choice, and a captive market, so there is little chance of the device being made cheaply. So that’s the first issue, although one that we hope to get around by hiring them if we do any more International events.
The second one is also cost-based. While the inventors of the HANS device are happy for people to add the anchors to their own helmets (and it only involves drilling two holes; while the loads involved may be a lot for our necks, they are not for a mechanical device), the FIA do not allow this. Which means buying a new helmet, having to replace a perfectly good one with a new one. Once you see the price of HANS-equipped helmets, it becomes clear that for the extra money you’d need to spend, you may as well get the best, and get a Peltor HANS helmet, such as the G78 I bought back in September. I’ve worn it twice; once at Rallyday and once while in Tony Hawkins’ Audi.
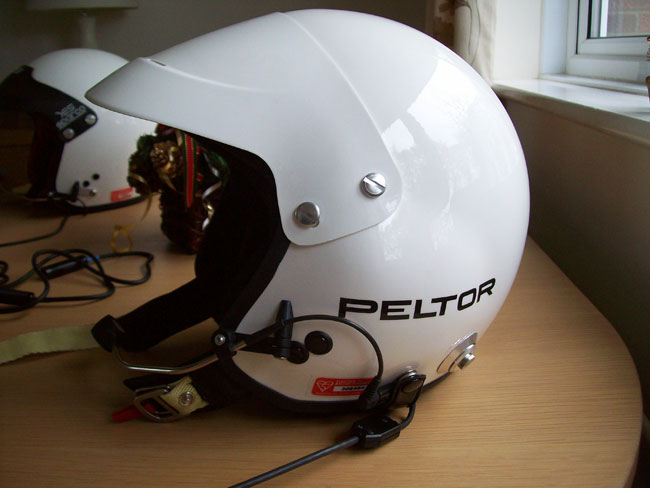
Peltor G78
This was £385, but it is a fantastic helmet. I had to send the first one back (a size 60) to Peter Lloyd Rallying, and they changed it for a 62 by return (fantastic service as ever from PLR, while still being massively cheaper than places like Demon Tweeks), and it fits like a glove. The problem was that this isn’t the end of the story; the intercom system used in this helmet is different to the low-spec OMP system that I have. I was considering making up an adapter and using my intercom until I navigated in Tony’s car; the difference was night and day. So, time to buy a Peltor amplifier.
Despite being a fairly simple device, these are not cheap. The old model just had a single control on it for volume, but a new model (the FMT120) has just been released, and offers individual volume controls and a lovely LED. Most importantly, it is well built and offers the same noise-free performance. The downside? It’s £170, even from Peter Lloyd. So I bought one and asked for money for Christmas to go towards it.
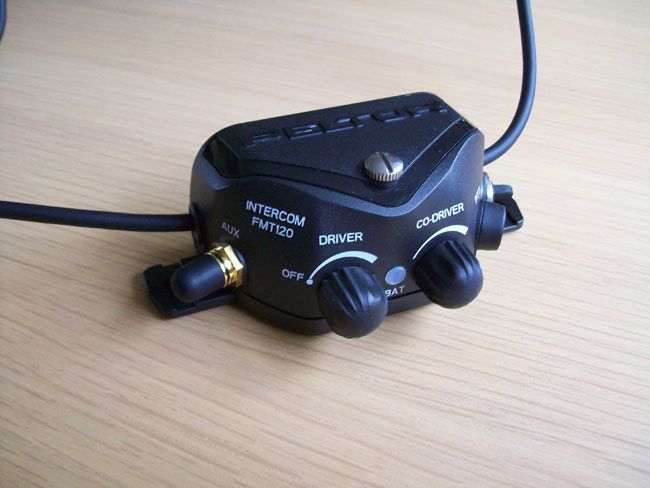
Peltor FMT120 Intercom
Oh, but of course we’re not finished there. Paul’s not in a position to splurge £400 on a new helmet at the moment, so instead I decided to convert his helmet to use a Peltor headset. The downside is that is was £90 for the mic, earpieces and cabling. The upside is that it was fairly easy to fit; obviously I can’t drill the helmet to suit the new intercom, so I’ve spent this morning making up a plate to mate the helmet and headset together. The end result is this:
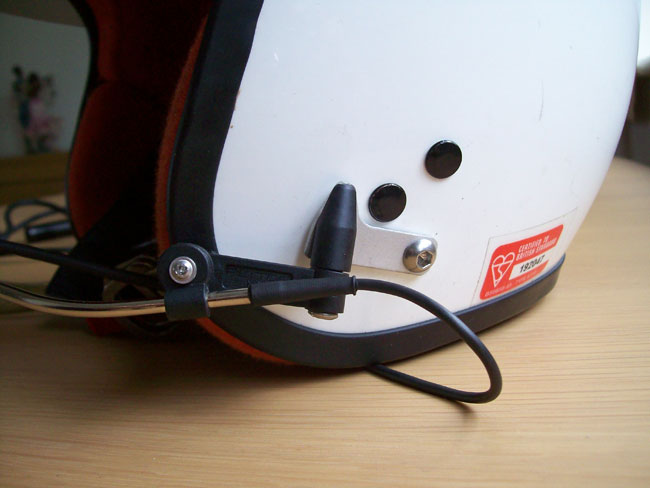
Peltor headset fitted neatly to OMP helmet
Are we done?
No. Because of the placement in the car (in front of us instead of on the rollcage which is not reachable when strapped in), the cables need to be extended, and I don’t want to butcher my lovely new intercom. Unlike everyone else’s intercoms, Peltor use military-spec connectors, made by a company called Nexus. Who only sell in quantities of 500+! On the upside, they have a European distributor who are a little more friendly to normal people. Even more of an upside was that they were in Upton, about 6 miles from my house. It got better – I phoned them, spoke to a helpful woman called Ellie who said they only had 2 in stock (a rarity), but actually went to check that they really did have them. Half an hour later, I picked them up. But of course, there’s a punchline, and anyone who’s bought anything that’s military spec will know what it is:

Nexus Plugs, for Peltor Intercom
Two of each of those cost me £33 in total!
So, all I need to do now is make up the cables, and a full £300 later I’ll have an intercom which will work…..
